Simple Widget Development
In this tutorial, we will explain how to create a basic widget that can be used for private integration.
The primary objectives of this tutorial are:
- to provide an in-depth understanding of how a widget works
- to demonstrate the communication between different files within the widget
What is a widget?
A widget is a small, functional application or tool that can be integrated into the Kommo platform to extend its capabilities and enhance its functionality.
Widgets in Kommo are used to provide additional features, streamline workflows, and improve user experience by allowing seamless interaction with third-party services or custom functionalities directly within the CRM interface.
Prerequisites
Before you start working on a widget, there are several things you need to know or explore.
1. Kommo account
To create an integration and upload a widget, you need to register an account on Kommo. You can use any type of account (trial/technical/company account) to upload and test your widget, but we recommend using a trial account for testing your integration.
2. Confident user of Kommo
To develop for Kommo users, you should be an experienced user of Kommo. It takes some time to understand how the system works and how different objects interact with each other. If the only thing you know about Kommo is its name, we highly recommend spending some time exploring it. This will help you better understand the needs of the future users of your widget.
3. Use VS Code
You should be familiar with using VS Code or another code editor. Developers can use VS Code to build, edit, and debug code, after which one can easily publish the app they are building.
4. Basic knowledge of CSS and HTML
Some knowledge of CSS and HTML is expected, as a widget is all about the visual part of an integration. They are fundamental to web development, with HTML providing the basic framework and CSS adding styling elements.
We don't aim to teach you programming.
5. Comfortable knowledge of JavaScript
The script.js file is written in JavaScript.
To develop a widget, you should have a good understanding of JavaScript.
You need to be familiar with JavaScript concepts such as variables, functions, objects, arrays, and DOM manipulation.
➕ Additionally, knowledge of event handling, asynchronous programming, and AJAX will be beneficial for creating interactive and dynamic widgets.
6. Familiar with JQuery
JQuery is a JavaScript library that was created to make your life easier.
$(document).ready(function(){
  $("p").click(function(){
    $(this).hide();
  });
});
7. Knowledge of Twig
Make sure you're familiar with Twig. Twig is a templating engine designed for generating HTML. It is primarily used with PHP, but we use it in conjunction with JavaScript to generate HTML on the client side instead of on the server.
An example of a delete_button.twig:
<span id="{{ id }}" class="button-delete {{ class_name }}">
	<span class="icon icon-delete-trash"></span>
	{{text}}
</span>
Structure of widget
In Kommo a widget looks like an archive of files.
Some of the files are mandatory, others add functionality and design.
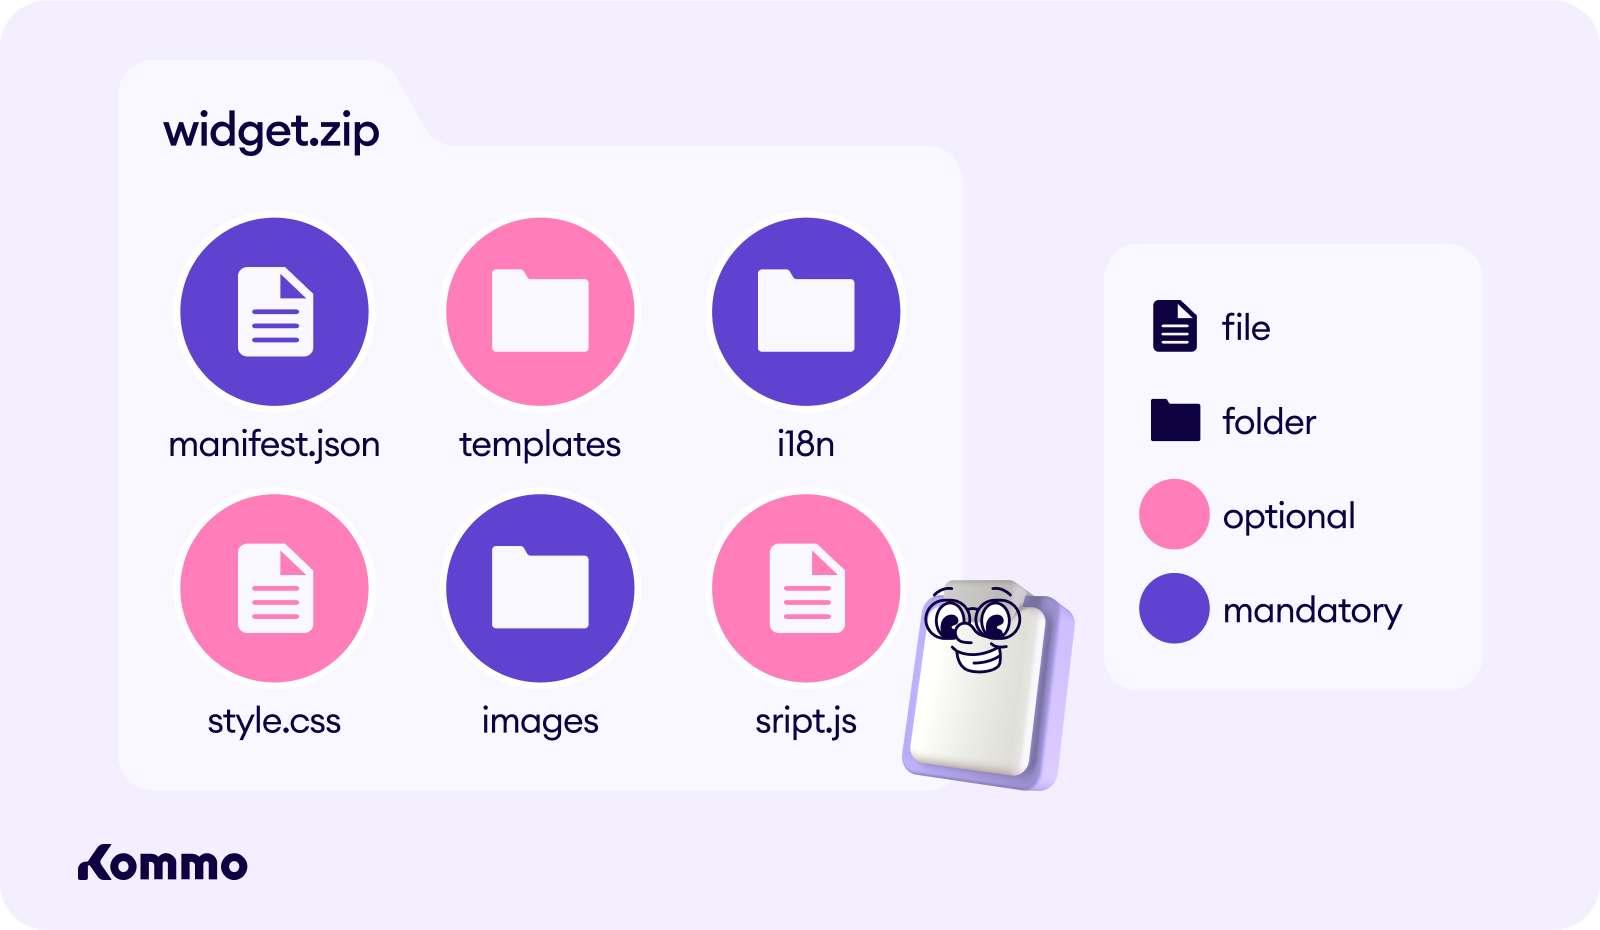
Let's have a closer look at each component of the widget.
manifest.json
manifest.json is the main file of a widget. It links together localization files, images and files with JS.
The file itself includes the widget's name, description, images, version, language files, and different kinds of settings.
In manifest.json you should mention what Marketplace your widget will be shown at (you should choose languages here), what part of the system your widget will initialize in ( e.g. contact profile or digital pipeline), you can provide an email for clients' inquiries and show what version of the widget it is.
script.js
A widget is represented as an object, containing properties and methods that are useful to work with. When the system loads widgets, it adds the functionality described in script.js to the existing system Widget object. This means that the CustomWidget object inherits properties and methods that will be helpful for further work.
The JavaScript (JS) portion of the widget contains required components and additional functions. It also includes callback functions that are triggered under specific conditions.
With the script.js you have a simple tool for interacting with the DOM and performing cross-domain requests. You can use it to create basic text widgets, modify the design of page elements, generate information blocks from external data, or send data to external services. These changes will work immediately for all users of your account.
i18n
i18n is the folder where you add localization files.
If you want your widget to be available in all the languages, you should add three localization files: en.json, es.json, pt.json.
If you have more than one localization, keep in mind that they should be of the same structure.
Example
{
    "widget":{
        "name":"My Widget",
        "short_description":"Short description",
        "description":"Full description",
        "tour_description":"Tour description"
    }
}{
"widget":{
"name":"Mi Widget",
"short_description":"Descripción breve",
"description":"Descripción completa",
"tour_description":"Descripción del Tour"
}
}{
"widget":{
"name":"Meu widget",
"short_description":"Descrição curta",
"description":"Descrição completa",
"tour_description":"Descrição de tour"
}
}templates
You can pass one of the templates of our system to the function, for this you need to specify a link to the template in the passed data object: ref: ‘/tmpl/controls/#TEMPLATE_NAME#.twig’, where #TEMPLATE_NAME# is one of the system templates.
You pass ref: ‘/tmpl/controls/#TEMPLATE_NAME#.twig and parameters of the template to the self.render() method.
This way you don't need to add templates to the templates folder.
define(['jquery'], function ($) {
  'use strict';

  return function () {
    var self = this;

    this.callbacks = {
      render: function () {
        return true;
      },

      init: function () {
        return true;
      },

      bind_actions: function () {
        return true;
      },

      settings: function () {
        var $modal_body = $('.modal.' + self.get_settings().widget_code + ' .modal-body'),
            $widget_settings = $modal_body.find('.widget_settings_block');

        $widget_settings.html(
          self.render({ ref: '/tmpl/controls/button.twig' }, {
            text: 'Button'
          })
        );

        return true;
      },

      onSave: function () {
        return true;
      }
    };
  };
});
A button from the example above will look like this

You can pass other parameters apart from text.
For example, if you pass true to the blue parameter, the button will become blue.

You can provide references to not only existing system templates but also your own templates. To do this, you'll need to create a templates folder within our widget folder and place the twig template in it.
images
Even if your widget isn't explicitly displayed anywhere except for the integration section, you still need to upload the images folder.
Number of logos to be uploaded: 5
🌠logo_min.png
🎑 logo_medium.png
🌁logo_main.png
🏞logo.png
🌇logo_small.png
If your widget initializes in Digital Pipeline, you should also add logo_dp.png to the images folder.
PNG is the only format that can be used for logos.Other images (except for slideshow images) can be in SVG or JPG format.
style.css
The CSS file contains styles for the widget.
To ensure that the widget does not clash with other system elements and widgets, its CSS file should contain unique class names for all main and child elements.
Limitations
- You might remember that if you create a public widget, it will be available for everyone in Marketplace (in a corresponding language), but if you create a private one, you need to install it in every account where it's supposed to be used.
- A private widget doesn't initialize in the left menu bar.
Business case
When we were planning this tutorial, we wanted something that will show interaction between different fields (including custom fields), something that would use environment variables, something that would let add templates, something that would show how to perform a click when a user clicks another place of the system, something that would let give users different rights.
So we came up with an idea of a Birthday widget.
What the widget does in details
In the widget settings, you can do the following:
- Choose a profile (Contact or Lead) with a Birthday custom field.
- If you don't have such a field, you can create it in settings.
- Choose a profile where a task will be created, the type of the task, the users responsible for the task, and the text of the task.
- Create a template that can be sent to a client.
If it's the day of the client's birthday and the user responsible for the task enters the client's profile, they will get a task. If another responsible user or the same user opens the profile again, a task won't be created again.
The widget will be displayed on the right-side panel of a lead profile. If the current date matches with the birthday set in the lead or contact profile, you will see a button Send a birthday wish. If it doesn’t, you will just see a message telling you that none of your clients celebrate a birthday this day.
When you click the button, a list of templates with the widget templates at the top will open so you can choose one of them to send to your client.
Business case widget
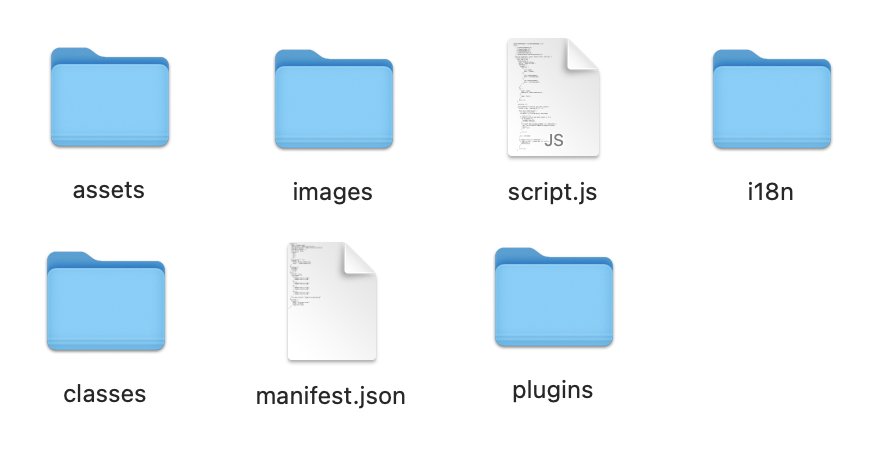
Let's get straight to the folder with parts of the widget
manifest.json
Let's have a look at the skeleton of the widget and its main part, manifest.json.
{
  "widget": {
    "name": "widget.name",
    "description": "widget.description",
    "short_description": "widget.short_description",
    "version": "1.0.1",
    "interface_version": 2,
    "init_once": false,
    "locale": [
      "en",
      "pt",
      "es"
    ],
    "installation": true,
    "support": {
      "link": "https://kommo.com",
      "email": "[email protected]"
    }
  },
  "locations": [
    "settings",
    "lcard-1",
    "ccard-0"
  ],
  "tour": {
    "is_tour": true,
    "tour_images": {
      "en": [
        "/images/slideshow_1_en.jpg",
        "/images/slideshow_2_en.jpg",
        "/images/slideshow_3_en.jpg"
      ],
      "es": [
        "/images/slideshow_1_es.jpg",
        "/images/slideshow_2_es.jpg",
        "/images/slideshow_3_es.jpg"
      ],
      "pt": [
        "/images/slideshow_1_pt.jpg",
        "/images/slideshow_2_pt.jpg",
        "/images/slideshow_3_pt.jpg"
      ]
    },
    "tour_description": "widget.tour_description"
  },
  "settings": {
    "custom": {
      "name": "settings.custom",
      "type": "custom",
      "required": false
    }
  }
}
We will take a closer look to each part of the widget.
name and description
"widget": {
    "name": "widget.name",
    "description": "widget.description",
    "short_description": "widget.short_description",
Here we show that the widget name, description, and a short description will be taken from localization files.
version and init_once
 "version": "1.0.1",
    "interface_version": 2,
    "init_once": false,
Here you pass the version of your widget but since you don't need to update a private widget, you can pass any version here.
"interface_version" should be always set to 2.
Since the widget we work on isn't VoIP, we set "init_once" to false.
init_once method is responsible for widget initialization. If there is no common context for all the pages, you should pass false.
languages
"locale": [
      "en",
      "pt",
      "es"
    ],
Since we create an widget that can be seen when switching languages, we mention all the languages we support in "locale" array.
"en" stands for English.
"pt" stands for Portuguese.
"es" stands for Spanish.
installation and support
 "installation": true,
    "support": {
      "link": "https://kommo.com",
      "email": "[email protected]"
    }
  },
We set "installation" to true since we have to set up settings.
Usually, we set "installation" to false if the settings are supposed to be managed in another system that interacts with Kommo via API.
locations
"locations": [
    "settings",
    "lcard-1",
    "ccard-0"
  ],
"locations" field defines what areas the widget will initialize (be seen) in.
Our widget will initialize in:
"settings"( Widget installation and configuration page)"lcard-1"(the widget will be displayed on the right-side panel of a Lead profile)"ccard-0"(the widget will initialize in a Contact profile but won't appear on the right-side panel)
widget slideshow
"tour": {
    "is_tour": true,
    "tour_images": {
      "en": ["/images/slideshow_1_en.jpg", "/images/slideshow_2_en.jpg", "/images/slideshow_3_en.jpg"],
      "es": ["/images/slideshow_1_es.jpg", "/images/slideshow_2_es.jpg", "/images/slideshow_3_es.jpg"],
      "pt": ["/images/slideshow_1_pt.jpg", "/images/slideshow_2_pt.jpg", "/images/slideshow_3_pt.jpg"]
    },
    "tour_description": "widget.tour_description"
  }
We provide three images in every language for the widget slideshow.
"widget.tour_description" will be pulled from i18n files.
settings
 "settings": {
    "custom": {
      "name": "settings.custom",
      "type": "custom",
      "required": false
    }
  }
}
Since we have different types of input, we create custom settings. All the fields will be pulled from i18n files.
images
We should add all the images that the widget will use to the images folder.
There are plenty of images in the folder. They serve different purposes.
logos
Logos are images that are displayed in the areas of widget initializations. All of them should be addded to the folder, otherwise you will get a system error message like:

The most important images we should add are:

logo_main.png 400px x 272px

logo_medium.png 240px x 84px

logo.png 130px x 100px

logo_small.png 108px x 108px

logo_min.png 84px x 84px
Logo images should be in PNG format!
Since the widget doesn't initialize in Digital Pipeline, we didn't add a logo_dp to the images folder.
Slideshow images
Slideshow images are shown on the installation screen to show your integration in action.
They aren't mandatory for a private integration but we added them for the sake of tutorial.
What you should remember when you add slideshow images:
- you should add from 1 to 5 pictures
- they should 1188×616 pixels each in JPG format
- they should visually show the integration’s functionality, how the integration will be seen within Kommo, and its value to the user
- they should be high quality

If you widget supports different languages, you should provide slideshow images in all the languages.
other images
Other images are in SVG format. They are supposed to enhance the widget interface by making it more intuitive.
An intuitive interface is a user-friendly interface that works as expected and feels natural to the user.
It is pretty obvious, that if you hover-over or click this button, it will show you some information on a topic you could have problems understanding.
localization
Every line and word, used in the widget should be translated to all the languages you widget will be used in.
The structure should be the same in all the files.
{
  "widget": {
    "name": "Birthday",
    "short_description": "Happy Birthday widget",
    "description": "The Happy Birthday widget assigns a task on a client's birthday, so you never miss an important date.",
    "tour_description": "Happy Birthday widget"
  },
  "settings": {
    "custom": "Settings",
    "options": {
      "title": "Settings",
      "desc": "Set up the form for creating a new task"
    },
    "base": "Automatically create tasks within a selected profile when it's your client's birthday.",
    "not_active": "Install the widget to begin setup.",
    "lead": "Lead",
    "contact": "Contact",
    "field": {
      "title": "Birthday field",
      "desc": "Select a field that contains the birthday date",
      "tip": "Select a field type \"date\", \"birthday\" or \"date and time\", or create a new field by clicking \"Add new field\"",
      "or": "or",
      "create": "Add new field"
    },
    "entity": {
      "options": {
        "contact": "Contact",
        "lead": "Lead"
      }
    },
    "type": {
      "title": "Task type",
      "desc": "Select the type of task to assign"
    },
    "responsible": {
      "title": "Responsible user",
      "desc": "Assign a user responsible for this task",
      "select": "Select users",
      "numeral": "user,user,users",
      "current": "Current responsible user"
    },
    "text": {
      "title": "Task description",
      "desc": "Write the description or leave the field empty",
      "placeholder": "Task description..."
    },
    "template": {
      "title": "Chat templates",
      "desc": "Create a chat template to send to your clients",
      "name": {
        "title": "Template name",
        "desc": "Enter the template name that will be shown in the profile"
      },
      "text": {
        "title": "Message text",
        "desc": "Write the message text that will be sent to the client",
        "placeholder": "Message..."
      },
      "list": {
        "title": "List of created templates"
      },
      "create": "Create a template"
    },
    "errors": {
      "template_fields_required": "Enter the template name and message text to continue."
    },
    "modal": {
      "title": "Create new Birthday field",
      "name": {
        "title": "Name of the field",
        "desc": "Enter name of the field"
      },
      "entity": {
        "title": "Type of object",
        "desc": "Select type of object"
      },
      "success_saved": "New Birthday field was successfully created.",
      "create": "Create a field"
    },
    "widget_panel": {
      "birthday": "Today is your client's birthday!",
      "not_birthday": "No birthdays today. Check back tomorrow!",
      "congratulate": "Send a birthday wish"
    }
  }
}
classes
In order script.js file not to be too long, we divide some parts of it in classes. This way it is easier to read, edit, and manage it.
Just don't forget to import those classes in the beginning of script.js file.
define(
  [
    './classes/template.js',
    './classes/loader.js',
    './classes/kommo.js',
    './classes/events.js',
    './classes/settings.js',
    './plugins/jquery.serializejson.min.js',
  ]
./classes/cache.js
What happens in cache.js file?
return class Cache {
      constructor () {
        window.KommoWidget.cache = window.KommoWidget.cache || {}
      }
When a Cache object is created, it checks to see if a cache object already exists in the KommoWidget property of the window object. If the cache object does not exist, an empty cache object is created.
The following keys:values are stored in cache.
kbd_account :
{
  payload: {
    id: number; //account ID
    name: string; //account name
    subdomain: string;
    created_at: number; //unix timeStamp
    created_by: number;
    updated_at: number; //unix timeStamp
    updated_by: number;
    current_user_id: number;
    country: string;
    currency: string;
    currency_symbol: string;
    customers_mode: string;
    is_unsorted_on: boolean;
    mobile_feature_version: number;
    is_loss_reason_enabled: boolean;
    is_helpbot_enabled: boolean;
    is_technical_account: boolean;
    contact_name_display_order: number;
    _links: { self: { href: string } }; // GET request to account
    _embedded: {
      task_types: [
        {
          id: number;
          name: string;
          color: null;
          icon_id: null;
          code: string;
        }
      ];
    };
  };
  expires: number; //unix timeStamp
}
Next, let's have a look at Cache methods.
getItem(key)
The method is used to retrieve a value from the cache based on a given key.
getItem(key) {
      let result;
      if (window.KommoWidget.cache[key]) {
        result = window.KommoWidget.cache[key];
      } else {
        let cache = JSON.parse(window.sessionStorage.getItem(key) || null);
        if (cache !== null && cache.expires <= Math.floor(Date.now() / 1000)) {
          window.sessionStorage.removeItem(key);
        }

        result = (cache || {}).payload || null;
      }
      return result;
    }
It checks if the value for the key exists in the cache object in the KommoWidget. If it exists, it is returned.
If the value is not in cache, the method checks sessionStorage. If the value is found in sessionStorage and has not expired, it is retrieved and returned. If the value has expired, the value is removed from sessionStorage. Otherwise, null is returned.
setItem(key, value, expires, local)
The method is used to set a value to the cache.
setItem(key, value, expires, local) {
      if (local) {
        window.KommoWidget.cache[key] = value;
      } else {
        window.sessionStorage.setItem(
          key,
          JSON.stringify({
            payload: value,
            expires: Math.floor(Date.now() / 1000) + expires,
          })
        );
      }
    }
If local is true, the value is stored directly in the cache object in the KommoWidget. Otherwise the value is stored in sessionStorage. In both cases, the value is serialized to JSON and stored along with the expiration period value.
removeItem(key)
The method is used to remove a value from sessionStorage based on a given key.
removeItem (key) {
        window.sessionStorage.removeItem(key)
      }
./classes/http.js
First thing we do is importing cache.js.
define(
  [
    './cache.js'
  ],
request (type, payload, method, options = {})
request(type, payload, method, options = {}) {
      let cache = new Cache();
      return new Promise(function (resolve, reject) {
        let data = null;
        if (options.cache) {
          data = cache.getItem(options.cache.key);
        }

        if (!data) {
          $.ajax({
            url: options.baseURL + type,
            data: payload,
            method: method,
            beforeSend: function (xhr) {
              xhr.withCredentials = true;
            },
            headers: options.headers || {},
          })
            .done(function (data) {
              resolve(data);
            })
            .fail(function (resp) {
              reject(resp);
            });
        } else {
          resolve(data);
        }
      }).then(function (data) {
        return new Promise(function (resolve) {
          if (options.embedded && (data || {})["_embedded"]) {
            data = (data || {})["_embedded"][options.embedded] || [];
          }

          if (options.cache && data) {
            cache.setItem(
              options.cache.key,
              data,
              options.cache.expires,
              options.cache.local || false
            );
          }

          if (options.rk) {
            data = (data || {})[options.rk] || null;
          }

          resolve(data);
        });
      });
    }
The method makes an HTTP request. It accepts a request type (type), data to send (payload), request method (method) and parameters (options). If the cache option is specified in the parameters, an attempt is made to retrieve data from the cache. If there is no data in the cache, then an AJAX request is executed.
./classes/kommo.js
First thing we do is importing http.js.
define(
  [
    './http.js',
  ],
getAccount ()
getAccount() {
      return this.http.request(
        "/api/v4/account",
        { with: "task_types" },
        "GET",
        {
          cache: { key: "kbd_account", expires: 60 },
          baseURL: window.location.origin,
        }
      );
    }
The method uses the request() method of the http object to make an HTTP request to obtain account information.
getTasks(filter)
getTasks(filter) {
      return this.http
        .request(
          "/api/v4/tasks",
          {
            filter: filter,
          },
          "GET",
          {
            baseURL: window.location.origin,
          }
        )
        .then(function (data) {
          return ((data || {})._embedded || {}).tasks || [];
        });
    }
The method uses the http object's request() method to make an HTTP request to retrieve tasks with the given filter.
createTask(payload)
createTask(payload) {
      return this.http
        .request("/api/v4/tasks", JSON.stringify([payload]), "POST", {
          baseURL: window.location.origin,
        })
        .then(function (data) {
          return ((data || {})._embedded || {}).tasks || [];
        });
The method uses the http object's request() method to make an HTTP request to create a new task. It sends a POST request to the '/api/v4/tasks' endpoint, passing the new task data in the body.
createField(et, payload)
createField(et, payload) {
      let _this = this;
      return _this.http
        .request(
          "/api/v4/" + et + "/custom_fields",
          JSON.stringify([payload]),
          "POST",
          {
            baseURL: window.location.origin,
            headers: {
              "Content-Type": "application/json",
            },
          }
        )
        .then(function (data) {
          return (((data || {})._embedded || {}).custom_fields || [])[0] || {};
        });
    }
The method uses the http object's request() method to create a new custom field for the given entity (et). It sends a POST request to the '/api/v4/{et}/custom_fields' endpoint, passing the data of the new custom field in the request body.
createTemplate(payload)
createTemplate(payload) {
      return this.http
        .request(
          "/ajax/v1/chats/templates/add",
          JSON.stringify({
            request: payload,
          }),
          "POST",
          {
            baseURL: window.location.origin,
            headers: {
              "Content-Type": "application/json",
            },
          }
        )
        .then(function (data) {
          return (
            ((((data || {}).response || {}).chats || {}).templates || {})
              .added || 0
          );
        });
    }
The method uses the http object's request() method to create a new chat template. It sends a POST request to the '/ajax/v1/chats/templates/add' endpoint, passing the new template data in the request body.
getTemplates()
getTemplates() {
      return this.http
        .request(
          "/ajax/v4/chats/templates",
          {
            with: "integration,reviews",
            limit: 50,
            page: 1,
          },
          "GET",
          {
            baseURL: window.location.origin,
          }
        )
        .then(function (data) {
          return ((data || {})._embedded || {}).chat_templates || {};
        });
    }
The method uses the http object's request() method to get a list of chat templates. It sends a GET request to the '/ajax/v4/chats/templates' endpoint.
getUsers(users =[], page = 1)
getUsers(users = [], page = 1) {
      let _this = this;
      return this.http
        .request(
          "/api/v4/users",
          {
            limit: 100,
            page: page,
          },
          "GET",
          {
            baseURL: window.location.origin,
          }
        )
        .then(function (data) {
          return new Promise((resolve) => {
            let tmp = ((data || {})._embedded || {}).users || [];
            tmp.forEach(function (user) {
              if (user.rights.is_active) {
                users.push({
                  id: user.id,
                  option: user.name,
                  name: user.name,
                  is_admin: user.rights.is_admin,
                });
              }
            });

            if (data._page_count > 1 && data._page < data._page_count) {
              resolve(_this.getUsers(users, page + 1));
            } else {
              resolve(users);
            }
          });
The method uses the http object's request() method to get a list of users. It sends a GET request to the '/api/v4/users' endpoint, pushing all users into a users array.
getTaskTypes()
getTaskTypes() {
      let _this = this;
      return this.getAccount().then(function (account) {
        let types = ((account || {})._embedded || {}).task_types || {};
        types = Object.values(types).filter(function (item) {
          item.option = item.name;
          return item;
        });
        return types;
      });
    }
The method is used to get a list of task types from account information. First, it calls the getAccount() method to get account information and then extracts task types from the retrieved data.
getFields(et, page = 1, fields =[])
 getFields(et, page = 1, fields = []) {
      let _this = this;
      return _this.http
        .request(
          "/api/v4/" + et + "/custom_fields",
          {
            page: page,
          },
          "GET",
          {
            baseURL: window.location.origin,
          }
        )
        .then(function (data) {
          let cf = ((data || {})._embedded || {}).custom_fields || [];
          if (cf.length === 0) {
            return fields;
          }

          fields = fields.concat(cf);
          if (((data || {})._page_count || 0) > 1) {
            page++;
            return _this.getFields(et, page, fields);
          } else {
            return fields;
          }
        });
    }
The method uses the http object's request() method to obtain a list of custom fields for the given entity (et). It sends a GET request to the '/api/v4/{et}/custom_fields' endpoint, collecting all the fields into a fields array.
getEmptyPromise()
getEmptyPromise() {
      return new Promise(function (resolve) {
        resolve([]);
      });
    }
The method is used in the next function which has to return a Promise. But if there is nothing to return, it calls getEmptyPromise().
getFieldsByType(fieldTypes, entityType = null, addPostfix = false)
getFieldsByType(fieldTypes, entityType = null, addPostfix = false) {
      let _this = this;
      let entityTypes = [];
      if (entityType) {
        entityTypes = !Array.isArray(entityType) ? [entityType] : entityType;
      }

      return Promise.all([
        $.inArray(APP.element_types.leads, entityTypes) >= 0
          ? _this.getFields("leads")
          : _this.getEmptyPromise(),
        $.inArray(APP.element_types.contacts, entityTypes) >= 0
          ? _this.getFields("contacts")
          : _this.getEmptyPromise(),
      ]).then(function ([leadFields, contactFields]) {
        let fields = [];

        if (!Array.isArray(fieldTypes)) {
          fieldTypes = [fieldTypes];
        }

        entityTypes.forEach(function (et) {
          let cf = {};
          let postfix = "";
          switch (et) {
            case APP.element_types.contacts:
              cf = contactFields;
              postfix += " (" + _this.widget.i18n("settings.contact") + ")";
              break;
            case APP.element_types.leads:
              cf = leadFields;
              postfix += " (" + _this.widget.i18n("settings.lead") + ")";
              break;
          }

          if (!addPostfix) {
            postfix = "";
          }

          if (cf.length > 0) {
            cf.forEach(function (field) {
              if (
                APP.cf_types[field.type] &&
                $.inArray(APP.cf_types[field.type], fieldTypes) >= 0
              ) {
                fields.push({
                  id: field.id,
                  code: (field.code || "").toLowerCase(),
                  sort: field.sort,
                  option: field.name + postfix,
                  type: APP.cf_types[field.type],
                  entity_type: et,
                  parent_id: 0,
                  enums: field.enums || [],
                  is_hidden: false,
                });
              }
            });
          }
        });

        return fields;
      });
    }
The method is used to get custom fields of specific types. It sends queries to retrieve fields for various entity types (contacts, leads) and returns an array of field objects that match the given criteria.
./classes/events.js
First, we import the library moment and module 'lib/components/base/modal'. These dependencies are our system modules that you can use.
define(
  [
    'moment',
    'lib/components/base/modal',
  ],
settings()
settings() {
      let _this = this;
      const MODAL_DESTROY_TIMEOUT = 3000;

      $(".kommo-birthday__field-create__link").on("click", function () {
        let modal = _this.widget.templates.twig.modal(
          _this.widget.templates.render("settings.modal", {
            prefix: _this.widget.config.prefix,
            langs: _this.widget.i18n("settings.modal"),
            name: _this.widget.templates.twig.input({
              block: "field",
              code: "name",
            }),
            entity: _this.widget.templates.twig.select({
              block: "field",
              code: "entity",
              items: [
                {
                  id: APP.element_types.contacts,
                  option: _this.widget.i18n("settings.entity.options.contact"),
                },
                {
                  id: APP.element_types.leads,
                  option: _this.widget.i18n("settings.entity.options.lead"),
                },
              ],
              selected: APP.element_types.contacts,
            }),

            button: _this.widget.templates.twig.button({
              block: "field",
              code: "btn",
              text: _this.widget.i18n("settings.modal.create"),
            }),
          }),

          function () {},
          _this.widget.config.prefix + "__field-modal"
        );

        $("#" + _this.widget.config.prefix + "-field-btn-id").on(
          "click",

          function () {
            const resultModal = new Modal();

            let selected = {};
            let form =
              $(
                "#" + _this.widget.config.prefix + "__field-form"
              ).serializeJSON().params || {};
            let et = parseInt(form.field.entity) === 1 ? "contacts" : "leads";

            _this.widget.kommo
              .createField(et, {
                type: "birthday",
                name: form.field.name,
              })
              .then(function (result) {
                selected = result;

                return _this.widget.kommo.getFieldsByType(
                  [
                    APP.cf_types.date,
                    APP.cf_types.date_time,
                    APP.cf_types.birthday,
                  ],
                  [APP.element_types.contacts, APP.element_types.leads],
                  true
                );
              })
              .then(function (fields) {
                $("." + _this.widget.config.prefix + "__field-id").replaceWith(
                  _this.widget.templates.twig.select({
                    block: "field",
                    code: "id",
                    items: fields,
                    selected: selected.id || 0,
                  })
                );

                modal.destroy();

                resultModal.showSuccess(
                  _this.widget.i18n("settings.modal.success_saved"),
                  false,
                  MODAL_DESTROY_TIMEOUT
                );
              })
              .catch(() => {
                resultModal.showError("", false);
              });
          }
        );
      });

      if (_this.widget.info.params.templates.length > 0) {
        let created = _this.widget.info.params.templates.split(",");
        $("#kommo-birthday-templates-list").val(
          _this.widget.info.params.templates || ""
        );
        _this.widget.kommo.getTemplates().then(function (templates) {
          created = created.map(function (item) {
            return parseInt(item);
          });
          templates.filter(function (item) {
            if ($.inArray(item.id, created) > -1) {
              $("#kommo-birthday-templates-list-ul").append(
                "<li>" + item.name + "</li>"
              );
            }
          });
        });
      }

      $("#kommo-birthday-template-create-id").on("click", function () {
        let name = $("#kommo-birthday-template-name-id").val();
        let text = $("#kommo-birthday-template-text-id").val();

        if (name.length === 0 || text.length === 0) {
          new Modal().showError(
            _this.widget.i18n("settings.errors.template_fields_required"),
            false
          );
        } else {
          _this.widget.kommo
            .createTemplate({
              name: name,
              reply_name: name,
              content: text,
              reply_text: text,
              is_editable: true,
              type: "amocrm",
              attachments: [],
              buttons: [],
              widget_code: null,
              client_uuid: null,
              creator_logo_url: null,
              waba_footer: null,
              waba_category: null,
              waba_language: null,
              waba_examples: {},
              reviews: null,
              waba_header: null,
              waba_selected_waba_ids: [],
            })
            .then(function (id) {
              if (parseInt(id) > 0) {
                $("#kommo-birthday-template-text-id").val("");
                $("#kommo-birthday-template-name-id").val("");

                let old = $("#kommo-birthday-templates-list").val().split(",");
                old.push(id);
                old = old.filter(function (item) {
                  return parseInt(item) > 0;
                });
                $("#kommo-birthday-templates-list").val(old.join(","));
                $("#kommo-birthday-templates-list-ul").append(
                  "<li>" + name + "</li>"
                );
              }
            });
        }
      });
    }
The method processes events, such as clicks on the link to create a custom field for the widget (outputting a modal, drawing inputs and buttons in it, creating a custom field by clicking on a button) and the template creation button.
getBirthdayInfo()
getBirthdayInfo() {
      const fieldId = parseInt(
        this.widget.getNested(this.widget.info.params, "field.id", "")
      );

      const $wrap = $('.linked-form__field[data-id="' + fieldId + '"]');
      const filtered = $wrap.filter(function () {
        const formattedDate = Moment().format(
          APP.system.format.date.date_short
        );
        const dayMonth = $(this).find("input").val().slice(0, -5);

        return dayMonth === formattedDate;
      });

      const currentDate = Moment().format(APP.system.format.date.date);

      return {
        isBirthday: filtered.length > 0,
        currentDate: currentDate,
      };
    }
This method retrieves birthday information from the current page. It checks if any contact or lead has a birthday today and returns the current date.
card()
card() {
      const _this = this;

      const { isBirthday } = _this.getBirthdayInfo();

      if (isBirthday) {
        let entityType = parseInt(
          _this.widget.getNested(_this.widget.info.params, "entity.type", 2)
        );

        let responsibles = _this.widget.getNested(
          _this.widget.info.params,
          "tasks.responsible",
          {}
        );

        if (responsibles[1]) {
          responsibles[APP.data.current_card.main_user] =
            APP.data.current_card.main_user;
        }

        if (
          entityType === parseInt(APP.data.current_card.element_type) &&
          responsibles[APP.constant("user").id]
        ) {
          _this.createTask(isBirthday);
        }
      }
    }
The method checks if today's date matches the birthday. If it does and specific conditions (the user is in the lead profile, the user is responsible for sending a message to a client) are met, it calls a method to create a new task.
createTask(isBirthday)
createTask(isBirthday) {
      const _this = this;

      let { currentDate } = _this.getBirthdayInfo();

      if (isBirthday) {
        const taskType = parseInt(
          _this.widget.getNested(_this.widget.info.params, "tasks.type", 1)
        );

        _this.widget.kommo
          .getTasks({
            is_completed: 0,
            entity_type: APP.data.current_entity,
            entity_id: APP.data.current_card.id,
            task_type: taskType,
          })
          .then(function (tasks) {
            if (tasks.length === 0) {
              _this.widget.kommo.createTask({
                responsible_user_id: APP.constant("user").id,
                entity_id: APP.data.current_card.id,
                entity_type: "leads",
                task_type_id: taskType,
                text: _this.widget.getNested(
                  _this.widget.info.params,
                  "tasks.text",
                  "-"
                ),

                complete_till: Moment(
                  (currentDate += " 23:59"),
                  APP.system.format.date.full
                ).unix(),
              });
            }
          });
      }
    }
If today is the birthday and no tasks have been created, this method will create a new task using the birthday information and task parameters.
./classes/loader.js
prepend(elem)
prepend (elem) {
        elem.prepend(this.getHtml())
        return this
      }
The method adds HTML loader content before the specified elem element.
append(elem)
append (elem) {
        elem.append(this.getHtml())
        return this
      }
The method adds HTML loader content after the specified elem element.
getHtml()
getHtml() {
        let _this = this
        if (_this.html.length === 0) {
          _this.html = _this.templates.render(
            'loader',
            {
              widget: _this.langs.widget.name,
              icons: _this.widget.config.icons,
            },
          )
        }

        return _this.html
      }
The method gets the HTML content of the loader. If the HTML has not yet been generated, the method will render the loader twig template.
hide()
hide () {
        return $('.kommo-loader').hide()
      }
The method accesses elements with the '.kommo-loader' class and hides them.
show()
show () {
        $('.kommo-loader').show()
        return this
      }
The method accesses elements with the "kommo-loader" class and shows them.
remove()
remove () {
        $('.kommo-loader').remove()
        return this
      }
The method accesses elements with the "kommo-loader" class and deletes them.
displaySaveBtn(code)
displaySaveBtn(code) {
      $(".modal." + code)
        .find(".widget_settings_block__controls")
        .show();
      return this;
    }
The method displays a save button in a modal window with the specified code class.
./classes/settings.js
save(evt)
save (evt) {
        let _this = this
        let code = _this.widget.params.widget_code
        let isActive = false
        let params = ($('#' + _this.widget.config.prefix + '-settings__form').serializeJSON() || {}).params || {}

        return new Promise(function (resolve, reject) {
          isActive = evt.active === 'Y'

          let data = {
            is_active: isActive,
          }

          let installed = ((_this.widget.params || {}).active || 'N') === 'Y'
          if (!installed) {
            resolve({ 'reinstall': true })
          }

          if (isActive) {
            if (!_this.widget.validateSettings(params)) {
              $('.modal.' + code).
                find('.js-widget-save').
                trigger('button:save:error')

              reject()
            } else {
              data.params = params
            }
          }

          _this.widget.info = data
          evt.fields.custom = JSON.stringify(params)
          resolve(data)
        }).then(function () {
          return true
        })
      }
The method is used for saving widget settings. It handles the evt event and returns a Promise. Inside the method, it checks the widget's status (isActive), gathers data from the settings form (params), creates an object (data) with information about the widget's state, and handles the case when the widget was uninstalled. After processing, the method returns the data object upon successful saving.
load()
load () {
        let _this = this
        return new Promise((resolve, reject) => {
          _this.widget.info.params = (_this.widget.params || {}).custom || {}
          if (typeof _this.widget.info.params === 'string') {
            _this.widget.info.params = JSON.parse(_this.widget.info.params)
          }

          if (!_this.widget.info.params.templates) {
            _this.widget.info.params.templates = ''
          }
          resolve([])
        })
      }
The method is used for loading widget settings. It returns a Promise and performs preliminary configuration of widget parameters, such as params.templates.
./classes/template.js
The classes/template.js, which is used for rendering templates, is merely a wrapper around the widget's own this.render methods. This is intended to simplify the code a bit, but it doesn't mean that you have to use this specific implementation. You can stick to the basics or create your own solution. What is provided here is an example that can be improved.
First, we import libraries jquery, twigjs, text and a module 'lib/components/base/modal'.
define(
  [
    'jquery',
    'lib/components/base/modal',
    'twigjs',
    'text',
  ]
flushTextPlugin()
flushTextPlugin () {
        text.useXhr = function () {
          return true
        }
      }
The method is used for temporarily changing the settings for loading text files so that they are always loaded via XHR.
restoreTextPlugin()
restoreTextPlugin () {
        text.useXhr = this.textSavedXhr
      }
The method is used to restore the default settings for loading text files after a temporary change (flushTextPlugin()).
checkRegistry(name)
checkRegistry (name) {
        let id = 'kommo_bd_' + name
        return !!(Twig.Templates || {}).registry[id]
      }
The method is used to check the existence of a Twig template.
getFromRegistry(name)
getFromRegistry (name) {
        let id = 'kommo_bd_' + name
        return (Twig.Templates || {}).registry[id] || ''
      }
The method is used to retrieve a Twig template by its name.
preload()
preload () {
        return Promise.all([
            this.loadCss(),
            this.loadTemplates(),
          ],
        )
      }
The method is used for preloading templates and CSS files. It returns a Promise that resolves after all resources have been loaded.
loadTemplates()
loadTemplates() {
      let _this = this;
      return new Promise(function (resolve) {
        let area = APP.widgets.system.area;
        let templates = _this.templates.params[area] || [];
        _this.flushTextPlugin();
        if (templates.length > 0) {
          let load = [];
          let ids = [];
          templates.forEach(function (template) {
            if (template.id.indexOf(_this.widget.config.code) === -1) {
              template.id = _this.widget.config.code + "_" + template.id;
            }

            if (!template.url) {
              template.url =
                _this.widget.params.path +
                "/assets/templates" +
                template.path +
                ".twig?v=" +
                _this.widget.get_version();
            }

            if (!_this.checkRegistry(template.id)) {
              load.push("text!" + template.url);
              ids.push(template.id);
            } else {
              _this.templates.html[template.id] = _this.getFromRegistry(
                template.id
              );
            }
          });

          if (load.length > 0) {
            require(load, function () {
              for (let i = 0; i < arguments.length; i++) {
                _this.addTemplate(ids[i], arguments[i]);
              }
              resolve();
            });
          } else {
            resolve();
          }
        } else {
          resolve();
        }
      });
    }
The method is used for loading templates. This method utilizes APP.widgets.system.area to determine the current area within the application. It returns a Promise that resolves after all templates have been loaded.
addTemplate(name, data)
addTemplate(name, data) {
      let id = "kommo_bd_" + name;
      if (this.checkRegistry(name)) {
        this.templates.html[name] = Twig.Templates.registry[id];
        return;
      }

      this.templates.html[name] = twig({
        id: id,
        data: data,
        allowInlineIncludes: true,
      });
    }
The method is used to add a template to Twig. If a template with the given name already exists in the registry, it is updated; otherwise, a new template is created.
loadCss()
loadCss() {
      let _this = this;
      return new Promise(function (resolve) {
        let html = "";
        _this.css.forEach((file) => {
          let $style = null;
          let path =
            _this.widget.params.path +
            "/assets/css/" +
            file.name +
            ".css?v=" +
            _this.widget.params.version;
          if (file.append_id) {
            $style = $("#" + file.append_id);
          } else {
            $style = $('link[href="' + path + '"]');
          }

          if ($style.length < 1) {
            html +=
              '<link type="text/css" rel="stylesheet" href="' + path + '"';
            if (file.append_id) {
              html += ' id="' + file.append_id + '"';
            }
            html += ">";
          }
        });

        if (html.length > 0) {
          $("head").append(html);
        }

        resolve();
      });
    }
The method is used for loading CSS files. It returns a Promise that resolves after all CSS files have been loaded.
render(name, params)
render(name, params) {
      name = this.widget.config.code + "_" + name;
      return this.templates.html[name].render(params || {});
    }
The method is used for rendering a template by its name and passing parameters to it.
installPlaceholder(wrapDiv, exception = null)
installPlaceholder(wrapDiv, exception = null) {
      let params = {
        prefix: this.widget.config.prefix,
        langs: this.widget.i18n("settings"),
        active: false,
      };

      if (exception !== null) {
        params.exception = exception;
      }

      wrapDiv.prepend(this.render("settings.base", params));
      $("#kommo-settings").fadeIn(300);
      this.widget.loader.displaySaveBtn(this.widget.params.widget_code);
      return this.widget.loader.hide();
    }
The method is used to install a placeholder in a specific location on the page, as indicated by the wrapDiv argument. The exception argument can be used to specify an element that should be excluded from the placeholder installation.
get twig ()
The getter returns an object with methods for generating various user interface elements based on Twig templates from Kommo.
plugins
There is just one file in this folder, it's jquery.serializejson.min.js.
This plugin is designed for serializing form data into JSON format. It allows converting user-entered form data into JSON.
assets
When you open assets folder, you will see two other folders: css and templates.
css
We have two CSS files in the folder (kommo.css and style.css) for several reasons, such as code organization (making styles more readable), modularity (separate styles for different parts of the code), reusability (for example, files with common styles can be included in various projects to maintain a consistent look), dependency management (using multiple CSS files simplifies managing dependencies between styles, you can add or remove files without needing to change the entire project), and page load optimization (splitting styles into multiple files allows the browser to load only the CSS files needed for a specific page or component).
How the display of a tooltip when hovering over an image is implemented
.kommo__tooltip-wrap:hover .kommo-holdings__settings__tooltip {
    visibility: visible !important;
    opacity: 1 !important;
}

.kommo__tooltip-wrap:hover .kommo__settings__tooltip, .kommo__tooltip-wrap--icon:hover .kommo__settings__tooltip {
    visibility: visible !important;
    opacity: 1 !important;
}
When hovering over an element with the class kommo__tooltip-wrap, the tooltips become visible and opaque.
templates
loader.twig
This template represents a loader block that is displayed on the page while content is loading or asynchronous operations are being performed.
base.twig
This template is used to display the basic settings of the widget.
modal.twig
This template is used to display a settings modal window.
widget_right_panel.twig
This template is utilized to showcase a widget in the right-side panel. It takes two parameters: "text," which will vary based on whether there is a birthday person that day, and a button (only displayed if there is a birthday person).
script.js
responsible
responsible: _this.templates.twig.dropdown({
                        block: 'tasks',
                        code: 'responsible',
                        title_empty: _this.i18n('settings.responsible.select'),
                        title_numeral: _this.i18n(
                          'settings.responsible.numeral'),
                        name_is_array: true,
                        items: users.filter(function (user) {
                          user.name = 'params[tasks][responsible][' + user.id + ']'
                          user.is_checked = !!(_this.getNested(
                              _this.info.params,
                              'tasks.responsible', {})[user.id]
                          )
                          return user
                        }),
A dropdown list is added, where responsible users (user) are added to the info/params of the widget when a checkbox is clicked.
 `APP.widgets.list`](https://files.readme.io/44cce53-image.png)
We get this information from an environment variable APP.widgets.list
click
.then(() => {
              $(".kommo-birthday__button-congratulate").on(
                "click",
                function () {
                  setTimeout(function () {
                    $(".feed-compose__quick-actions-wrapper").click();
                  }, QUICK_ACTIONS_CLICK_TIMEOUT);
                }
              );
            });
Upon clicking the button ("Send a birthday wish"), a list of templates that can be sent to the chat opens
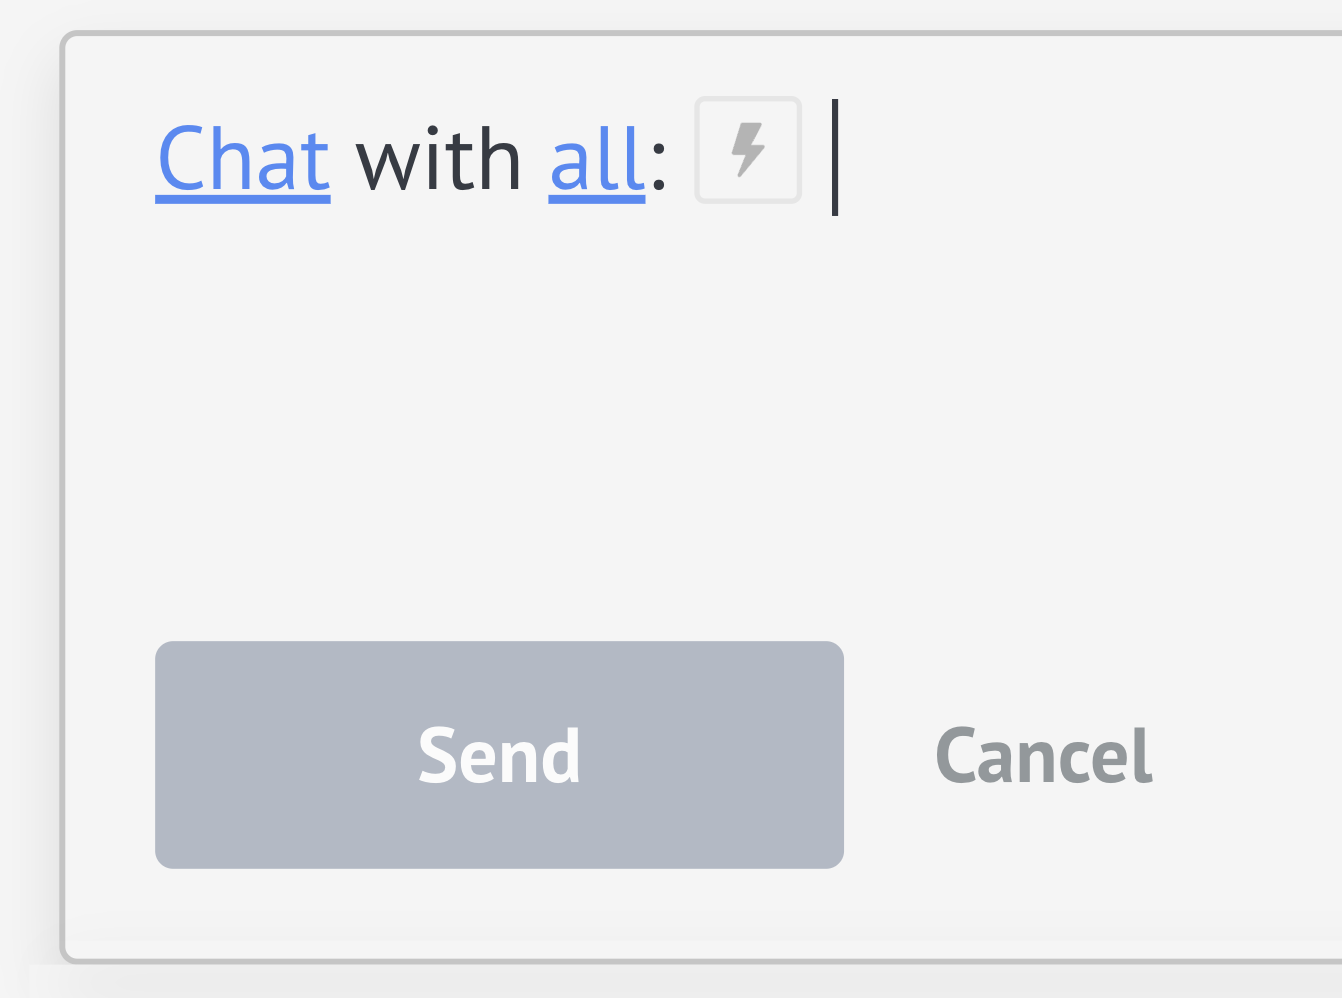
The button works correctly, if chats are already be open. The functionality does not include switching to a chat from other states.
Create a private integration and upload your widget
You can find the widget on Github.
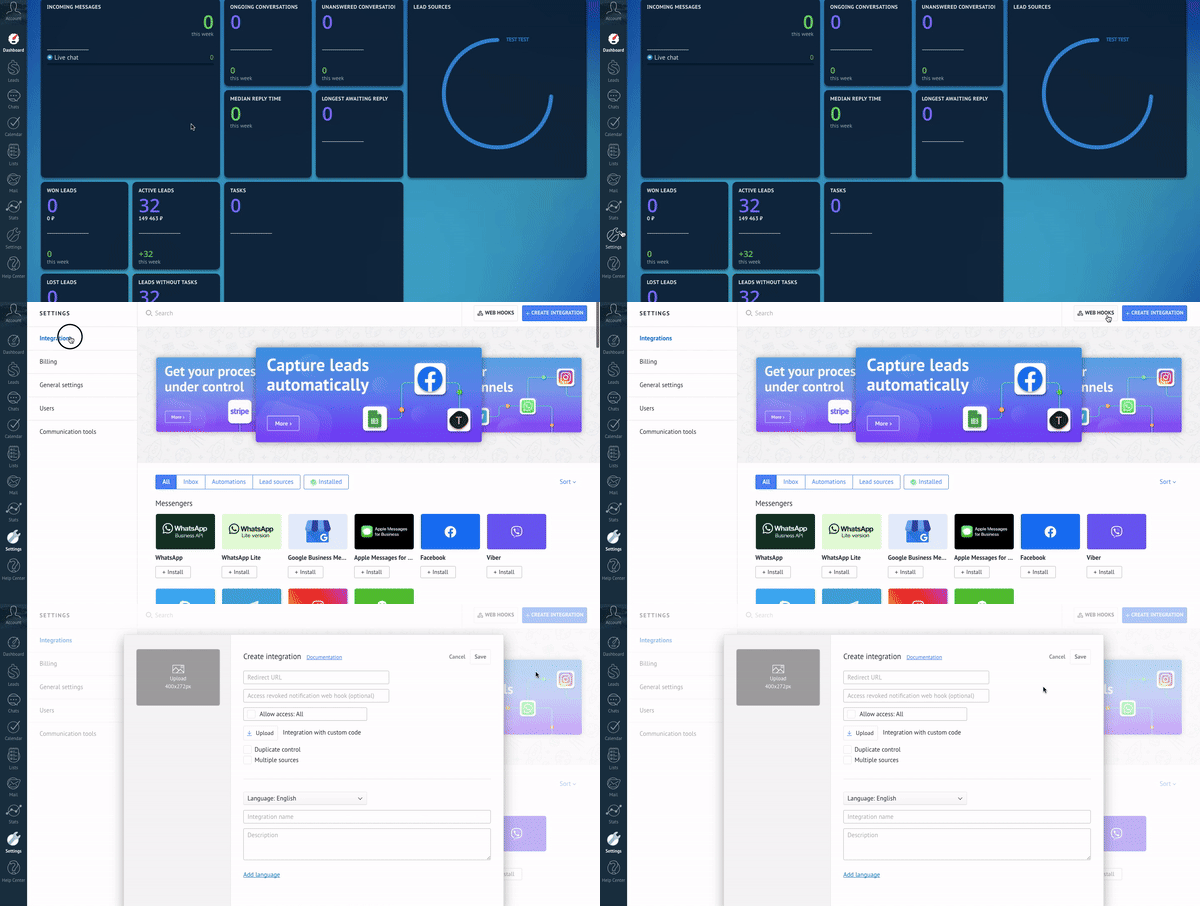
To create a private integration you should:
- Go to the Settings in the left menu
- Click Integrations
- Click the blue button + Create Integration in the top right corner
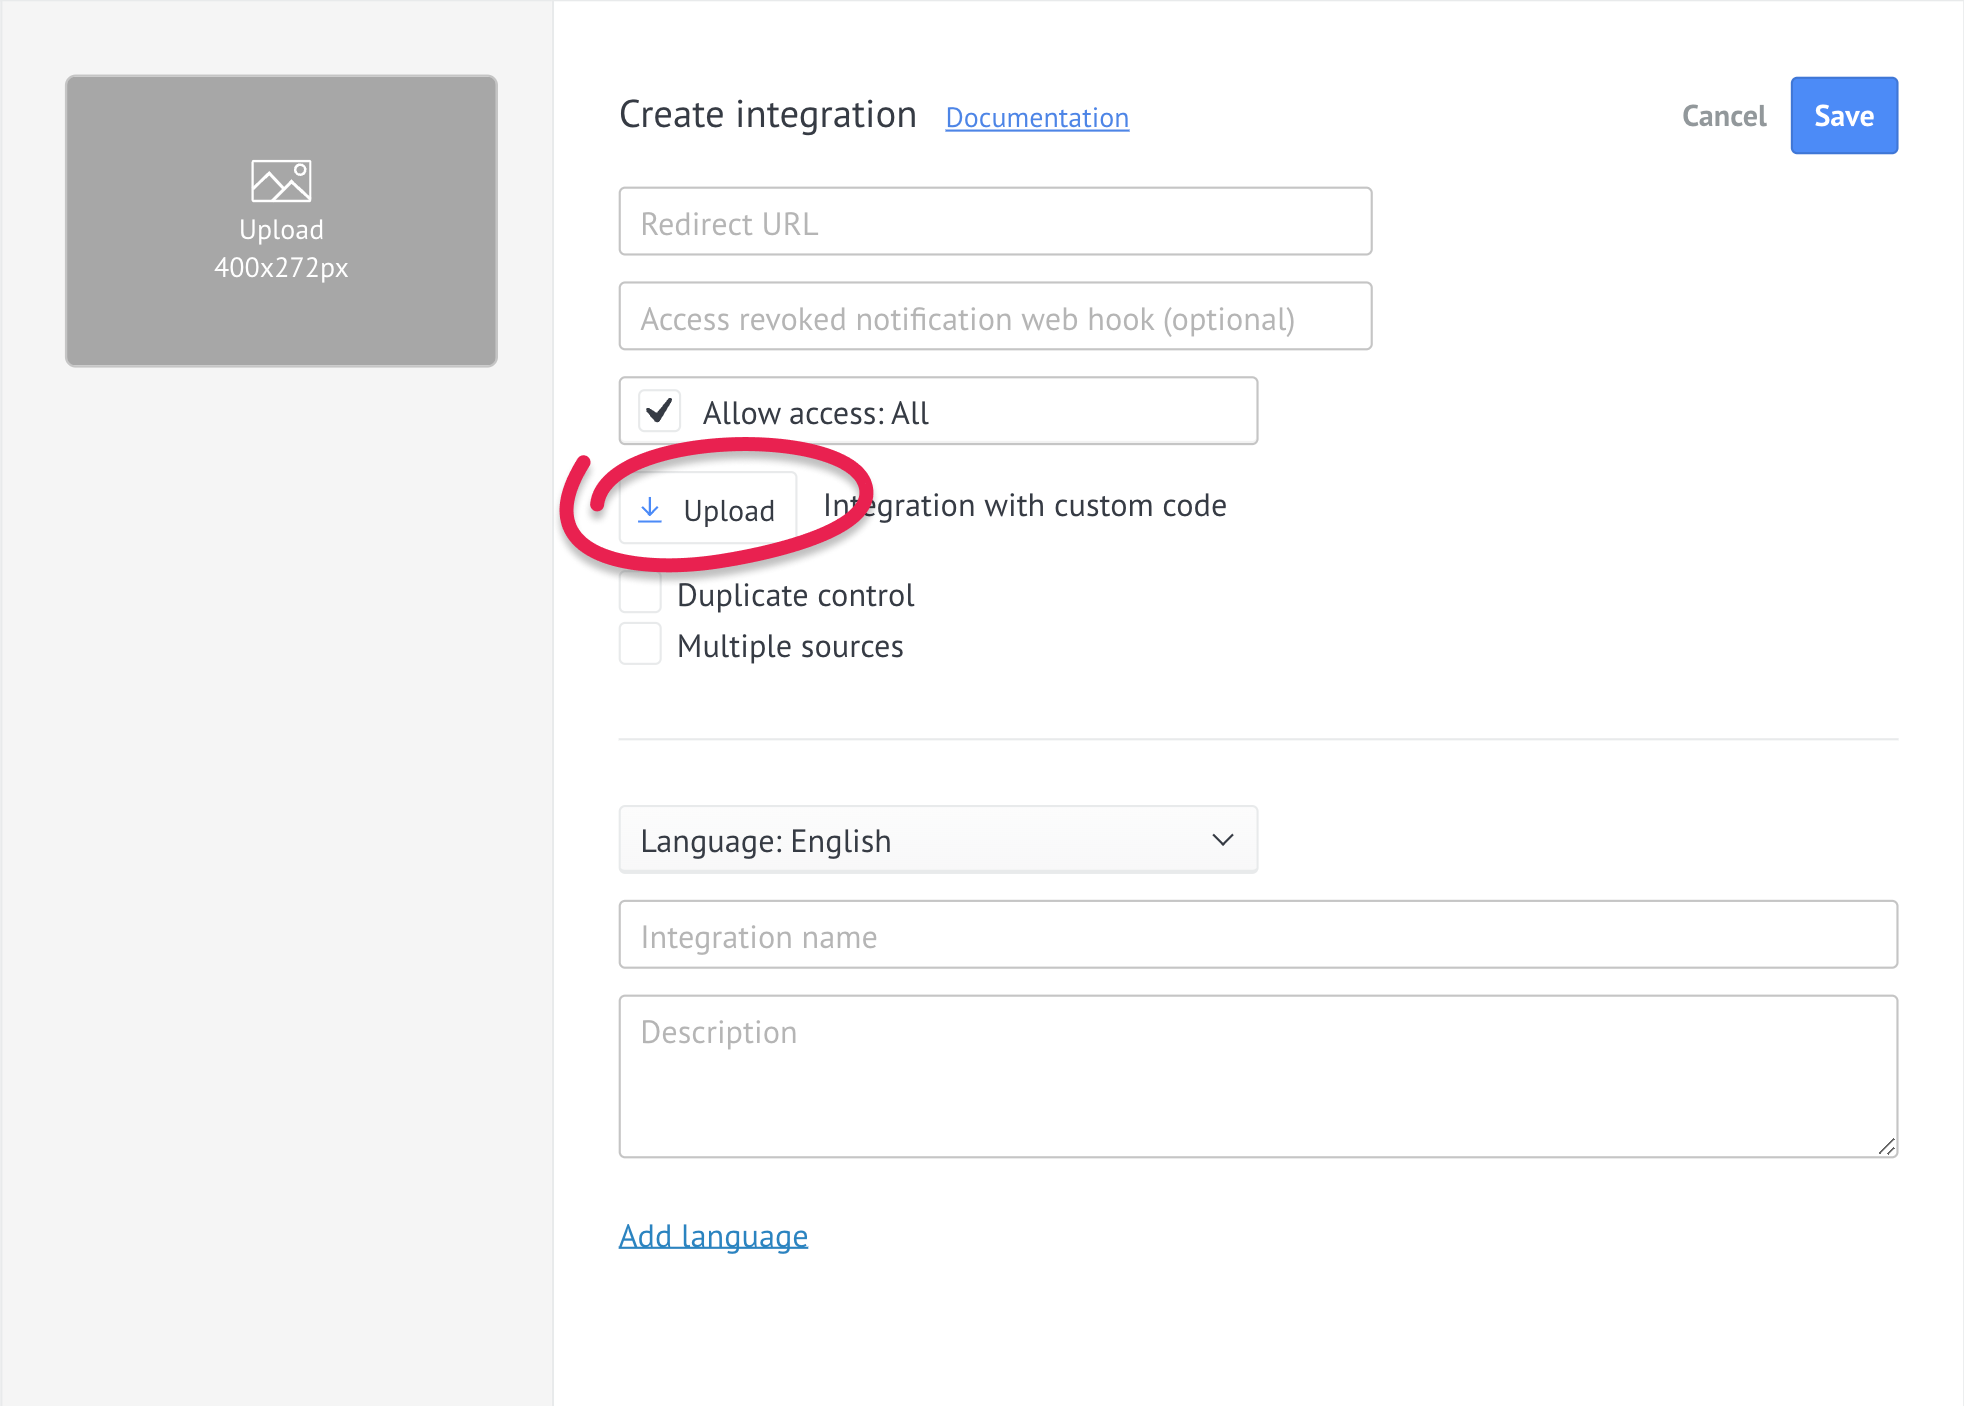
To upload the widget archive you need to click the Upload button.
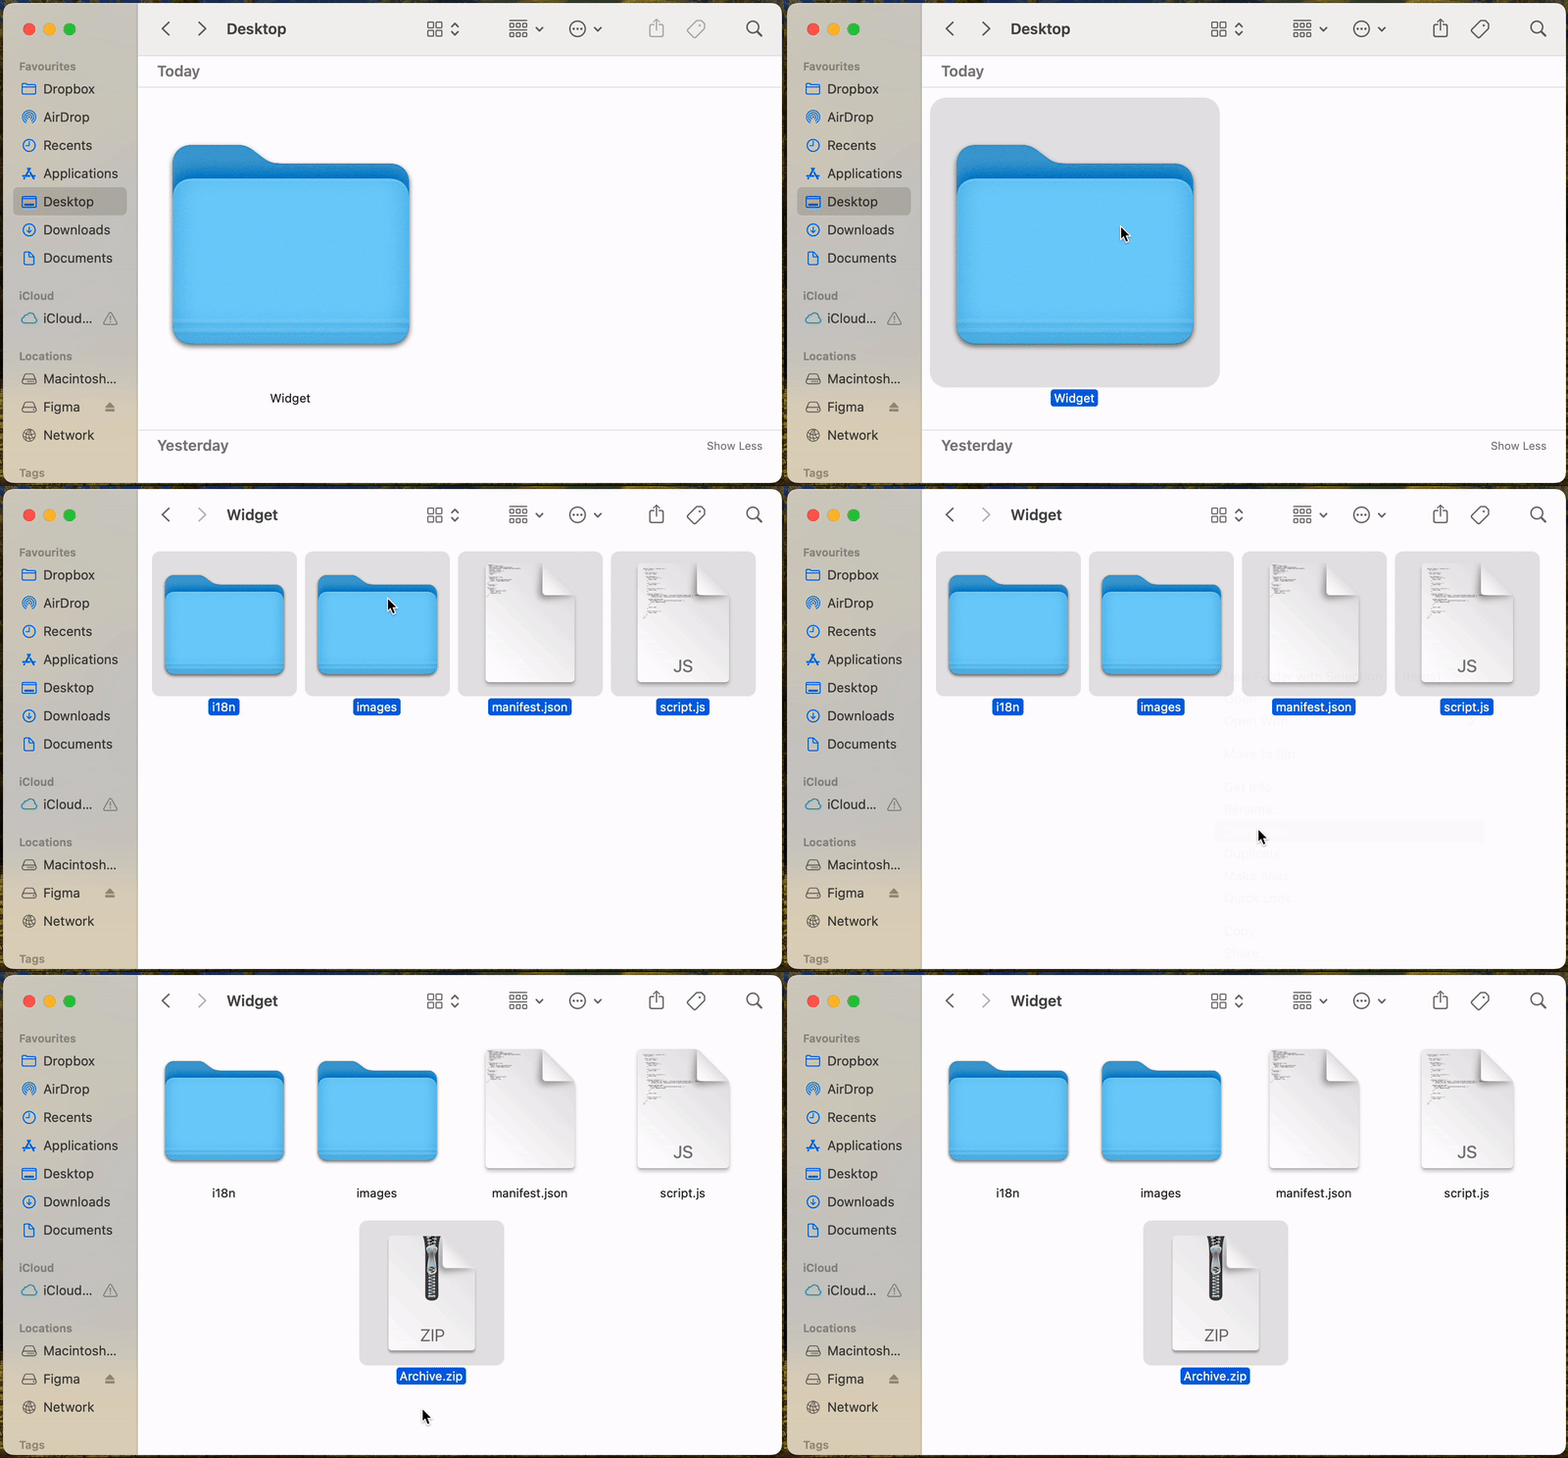
Before you upload the archive with the widget, make sure that all the files are at the root level of an archive.
...and that's it!
Now it's time to test the widget!
Updated 4 months ago