Lead Capture
Level : Basic/ Private Integration without a widget
You can watch this video in Spanish 🇪🇸 and in Portuguese 🇧🇷 too!
Intro
This tutorial will help beginners understand how to build an app. You will find answers to your questions about:
-
Kommo entities and how they interact with each other
-
a private integration creation
-
authorization
-
testing an app
-
basic Kommo API information
It's important to note that we won't teach you general programming or backend development but to understand Kommo and create integrations that solve client's problems without causing any damage.
A request from a client
Let's imagine you've got a request from your client. They have an online language school for young learners. The team isn't very big. There are a school manager, sales managers, teachers, and teachers' assistants. They have a website with a form that generates leads (their potential clients fill out the form to sign up for classes).
For some reason, they can't use existing form integrations. They need a solution that would collect all the leads and import them into their Kommo account.
So you tell your client that the best way to solve their problem is to create a private integration.
Step-by-step guide
Here you can find a guide on how to build an app in a client's account.
1. Get the account information
To create a working solution, you will have to make requests to Kommo API.
To request an account, you need to include the subdomain of the account in the URL.
For example,
https://littletreeschool.kommo.com/api/v4/lead
You can log into your account and find a subdomain of the account in the URL.

2. Create a private integration
A private integration exists in only one account. If it is created in an account, it has no access to other accounts.
So a private integration must be created in an account where it will be used, i.e., in the account of your client.
You don't need a technical account to start developing private integrations.
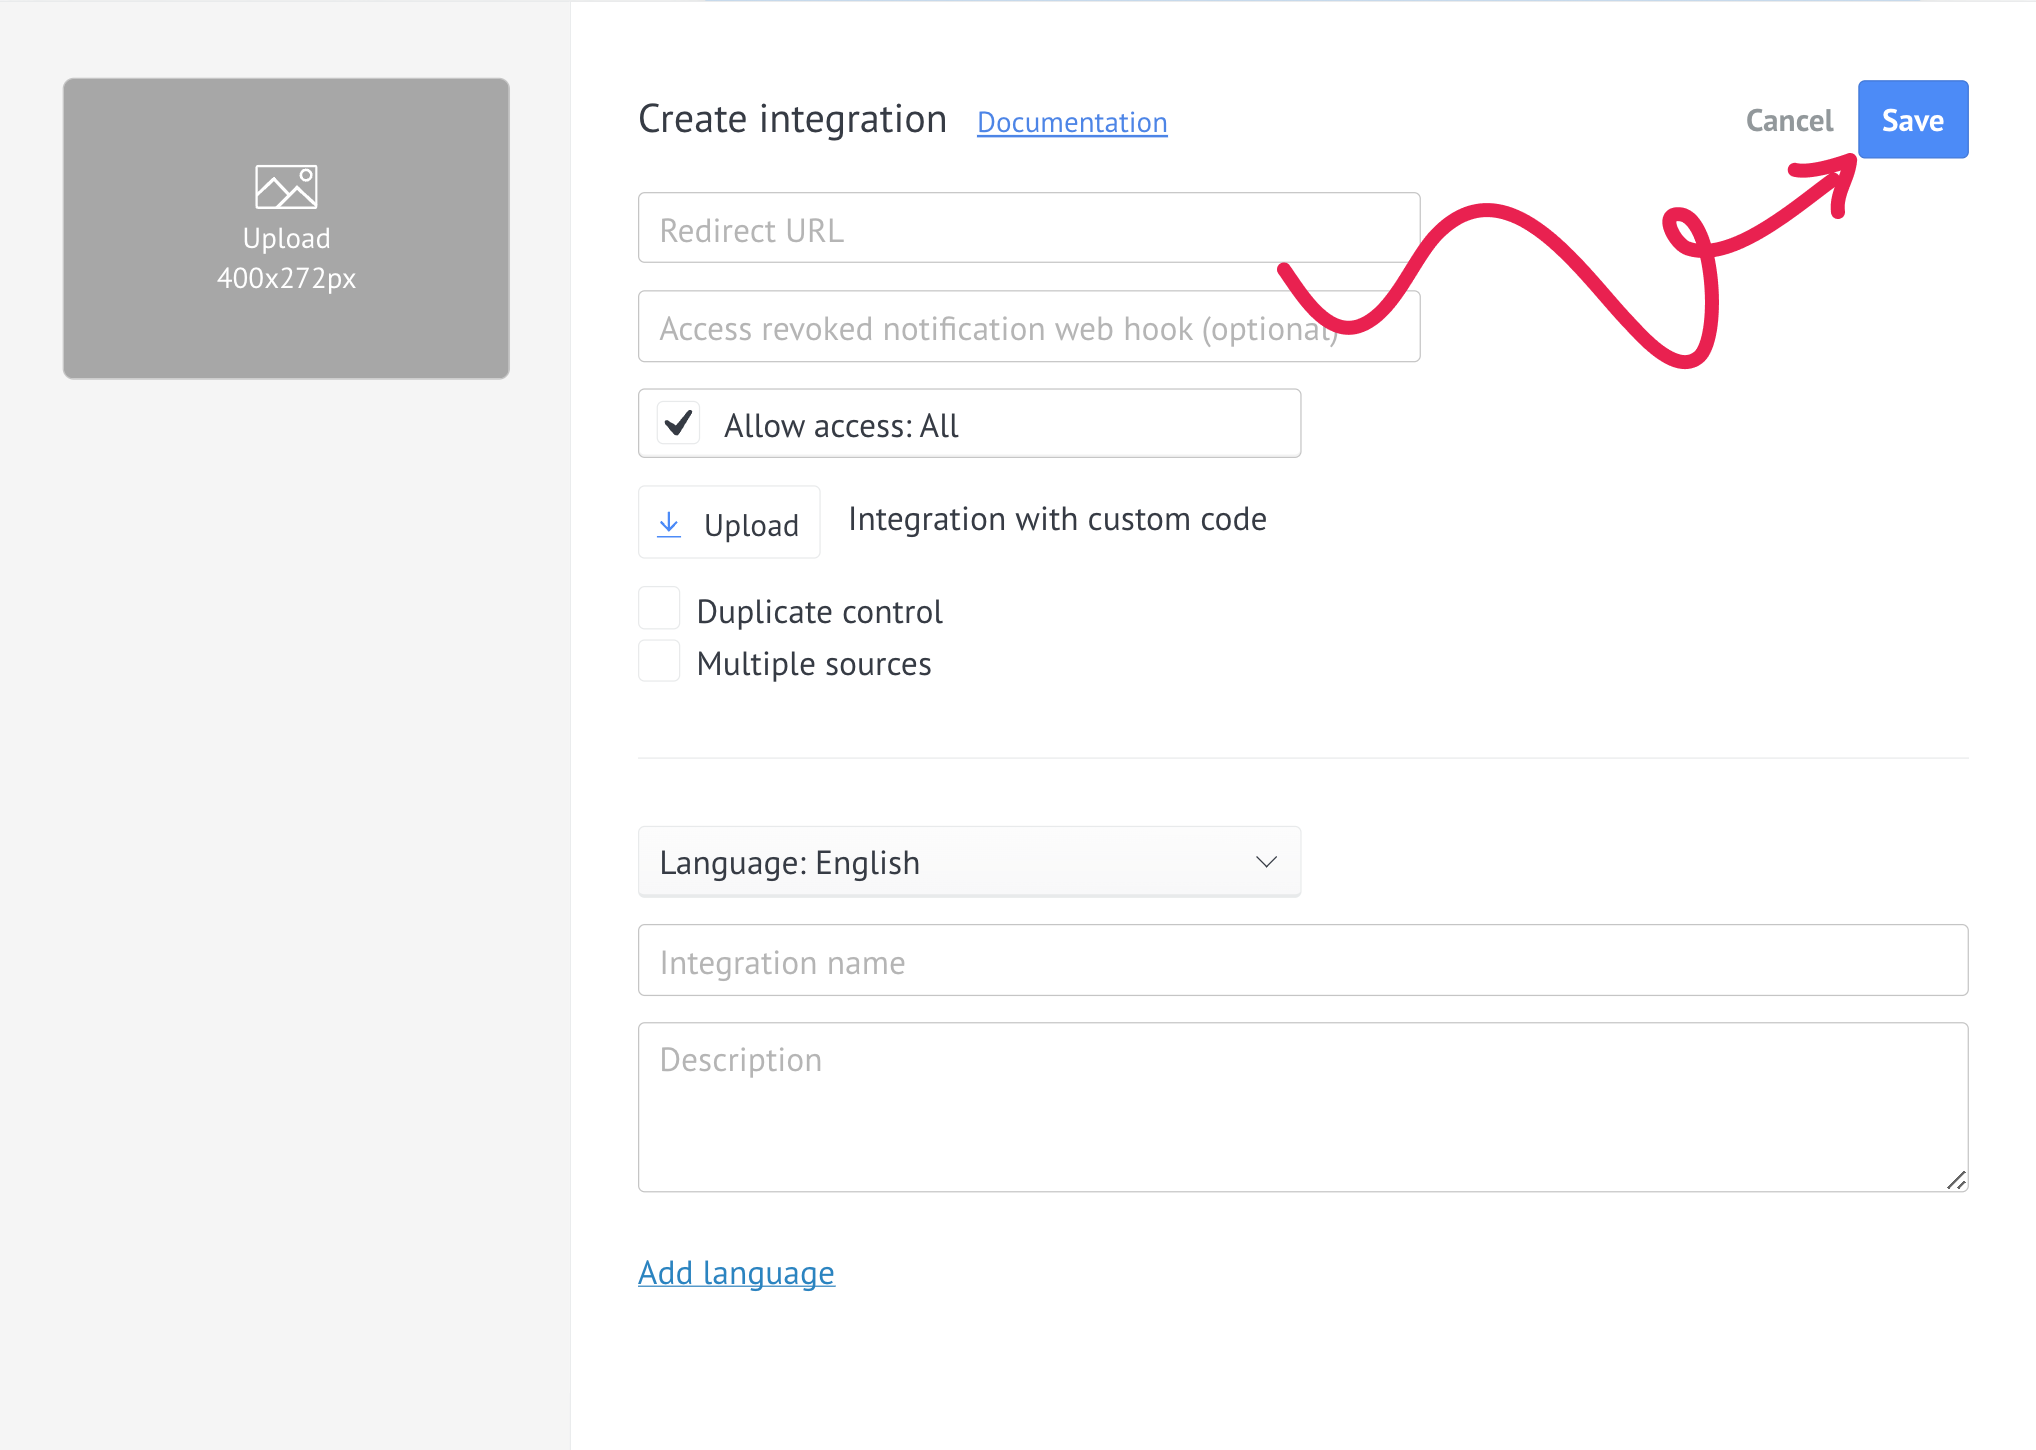
To create a private integration, you have to go to the Left Menu → Settings → Integrations → Create Integration button in the top right corner.
Then you are just one click away from a private integration.
3. Authorization
There are two types of authorization:
-
OAuth 2.0
OAuth 2.0 is more complicated. We won't focus on it in this tutorial.
A long-lived token will be used for the integration we are working on.
Open an integration that was created in a previous step and click the Keys and Scopes tab.
The only item that you will use is the long-lived token.
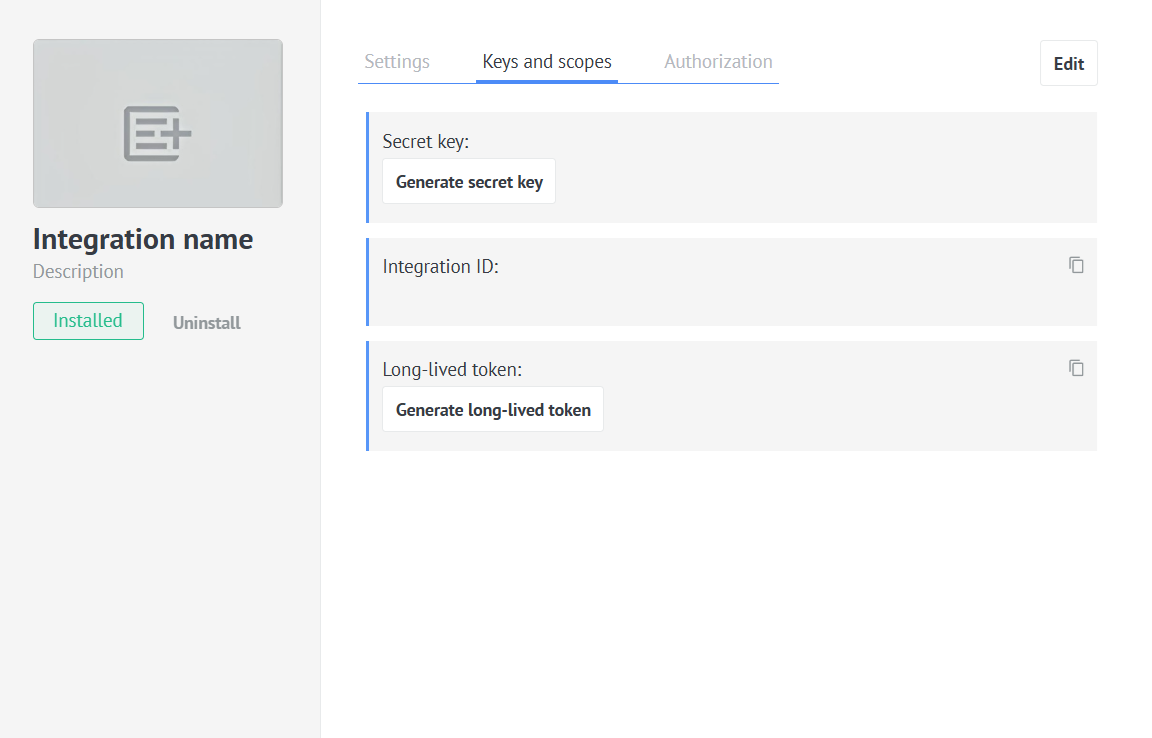
Click "Generate long-lived token"
How you can get this token:
-
You can obtain this token yourself if the administrator of the account gives you such rights (administrator rights). Then you generate the token and put it somewhere safe. If the admin of the account only takes away your administrator rights, it will still be able to use the token. They would also have to revoke access in the Authorization tab if they didn't want you to have access to their account via integration anymore.
-
An administrator of the account can create an integration themselves, generate a long-lived token, and share it with you.
Keep your long-lived token in a safe place!
4. Is there a sandbox?
When you create an integration into a client's account, there is always a risk that something can go wrong and affect data in the account (if your app isn't a read-only).
The best thing you can do to build a good product (your app) is to practice in a sandbox.
A trial account can become such a sandbox since it's not limited, like a technical one.
To create another trial account, go to kommo.com, click Go to account in the top right corner → Create account. Don't forget that it lasts only 14 days!
5. Basics of requests and responses
Once you've finished the previous steps, it is time to learn requests and responses basic information.
Methods
Use JSON format for API requests.
You must make all the API requests to the secure endpoint (HTTPS).
Kommo API uses the following HTTP verbs:
| Method | Description |
|---|---|
| GET | Request data from the server |
| POST | Create new data on the server |
| PATCH | Update existing data on the server |
| DELETE | Remove data from the server |
For example, POST /api/v4/leads request with a relevant body will add a lead to the account.
Limits
There is a limit to the number of API calls per second you can perform. This limit is applied to an IP address that is used to make calls.
You shouldn’t make more than 7 requests per second.
What happens if you go beyond the limit?
If you send too many requests once, you will get 429 Too Many Requests HTTP status code.
If the restrictions are violated multiple times, your IP address will be blocked and HTTP status code 403 Forbidden will be returned for any request.
6. What do I do with the subdomain and token?
So you've got your subdomain and token, but it's unclear what is the right place for them.
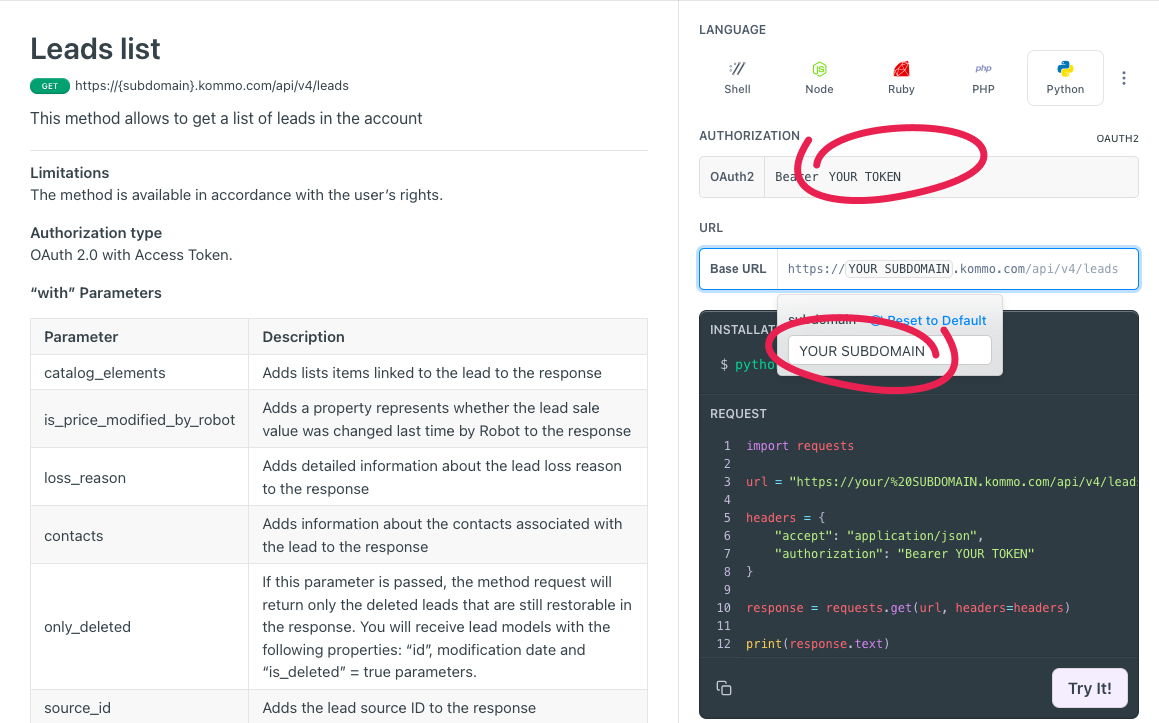
This is an example of a GET request. Pass your subdomain as a value to the SUBDOMAIN variable and your long-lived token as a value to the API_KEY variable.
import requests

SUBDOMAIN = ''
API_KEY = ''


GET_LEAD_URL = f'{SUBDOMAIN}.kommo.com/api/v4/leads'

headers = {
    'Authorization' : f'Bearer {API_KEY}',
    'Content-Type': 'application/json'
}

requests.get(GET_LEAD_URL, headers=headers)
There is also a recipe that could help with it.
If you want to use our API references to practice, it is even easier.
7. Entity relationship diagram and why we need it
An entity relationship diagram (ERD), also known as an entity relationship model, is a graphical representation that depicts relationships among people, objects, places, concepts or events within an information technology (IT) system.
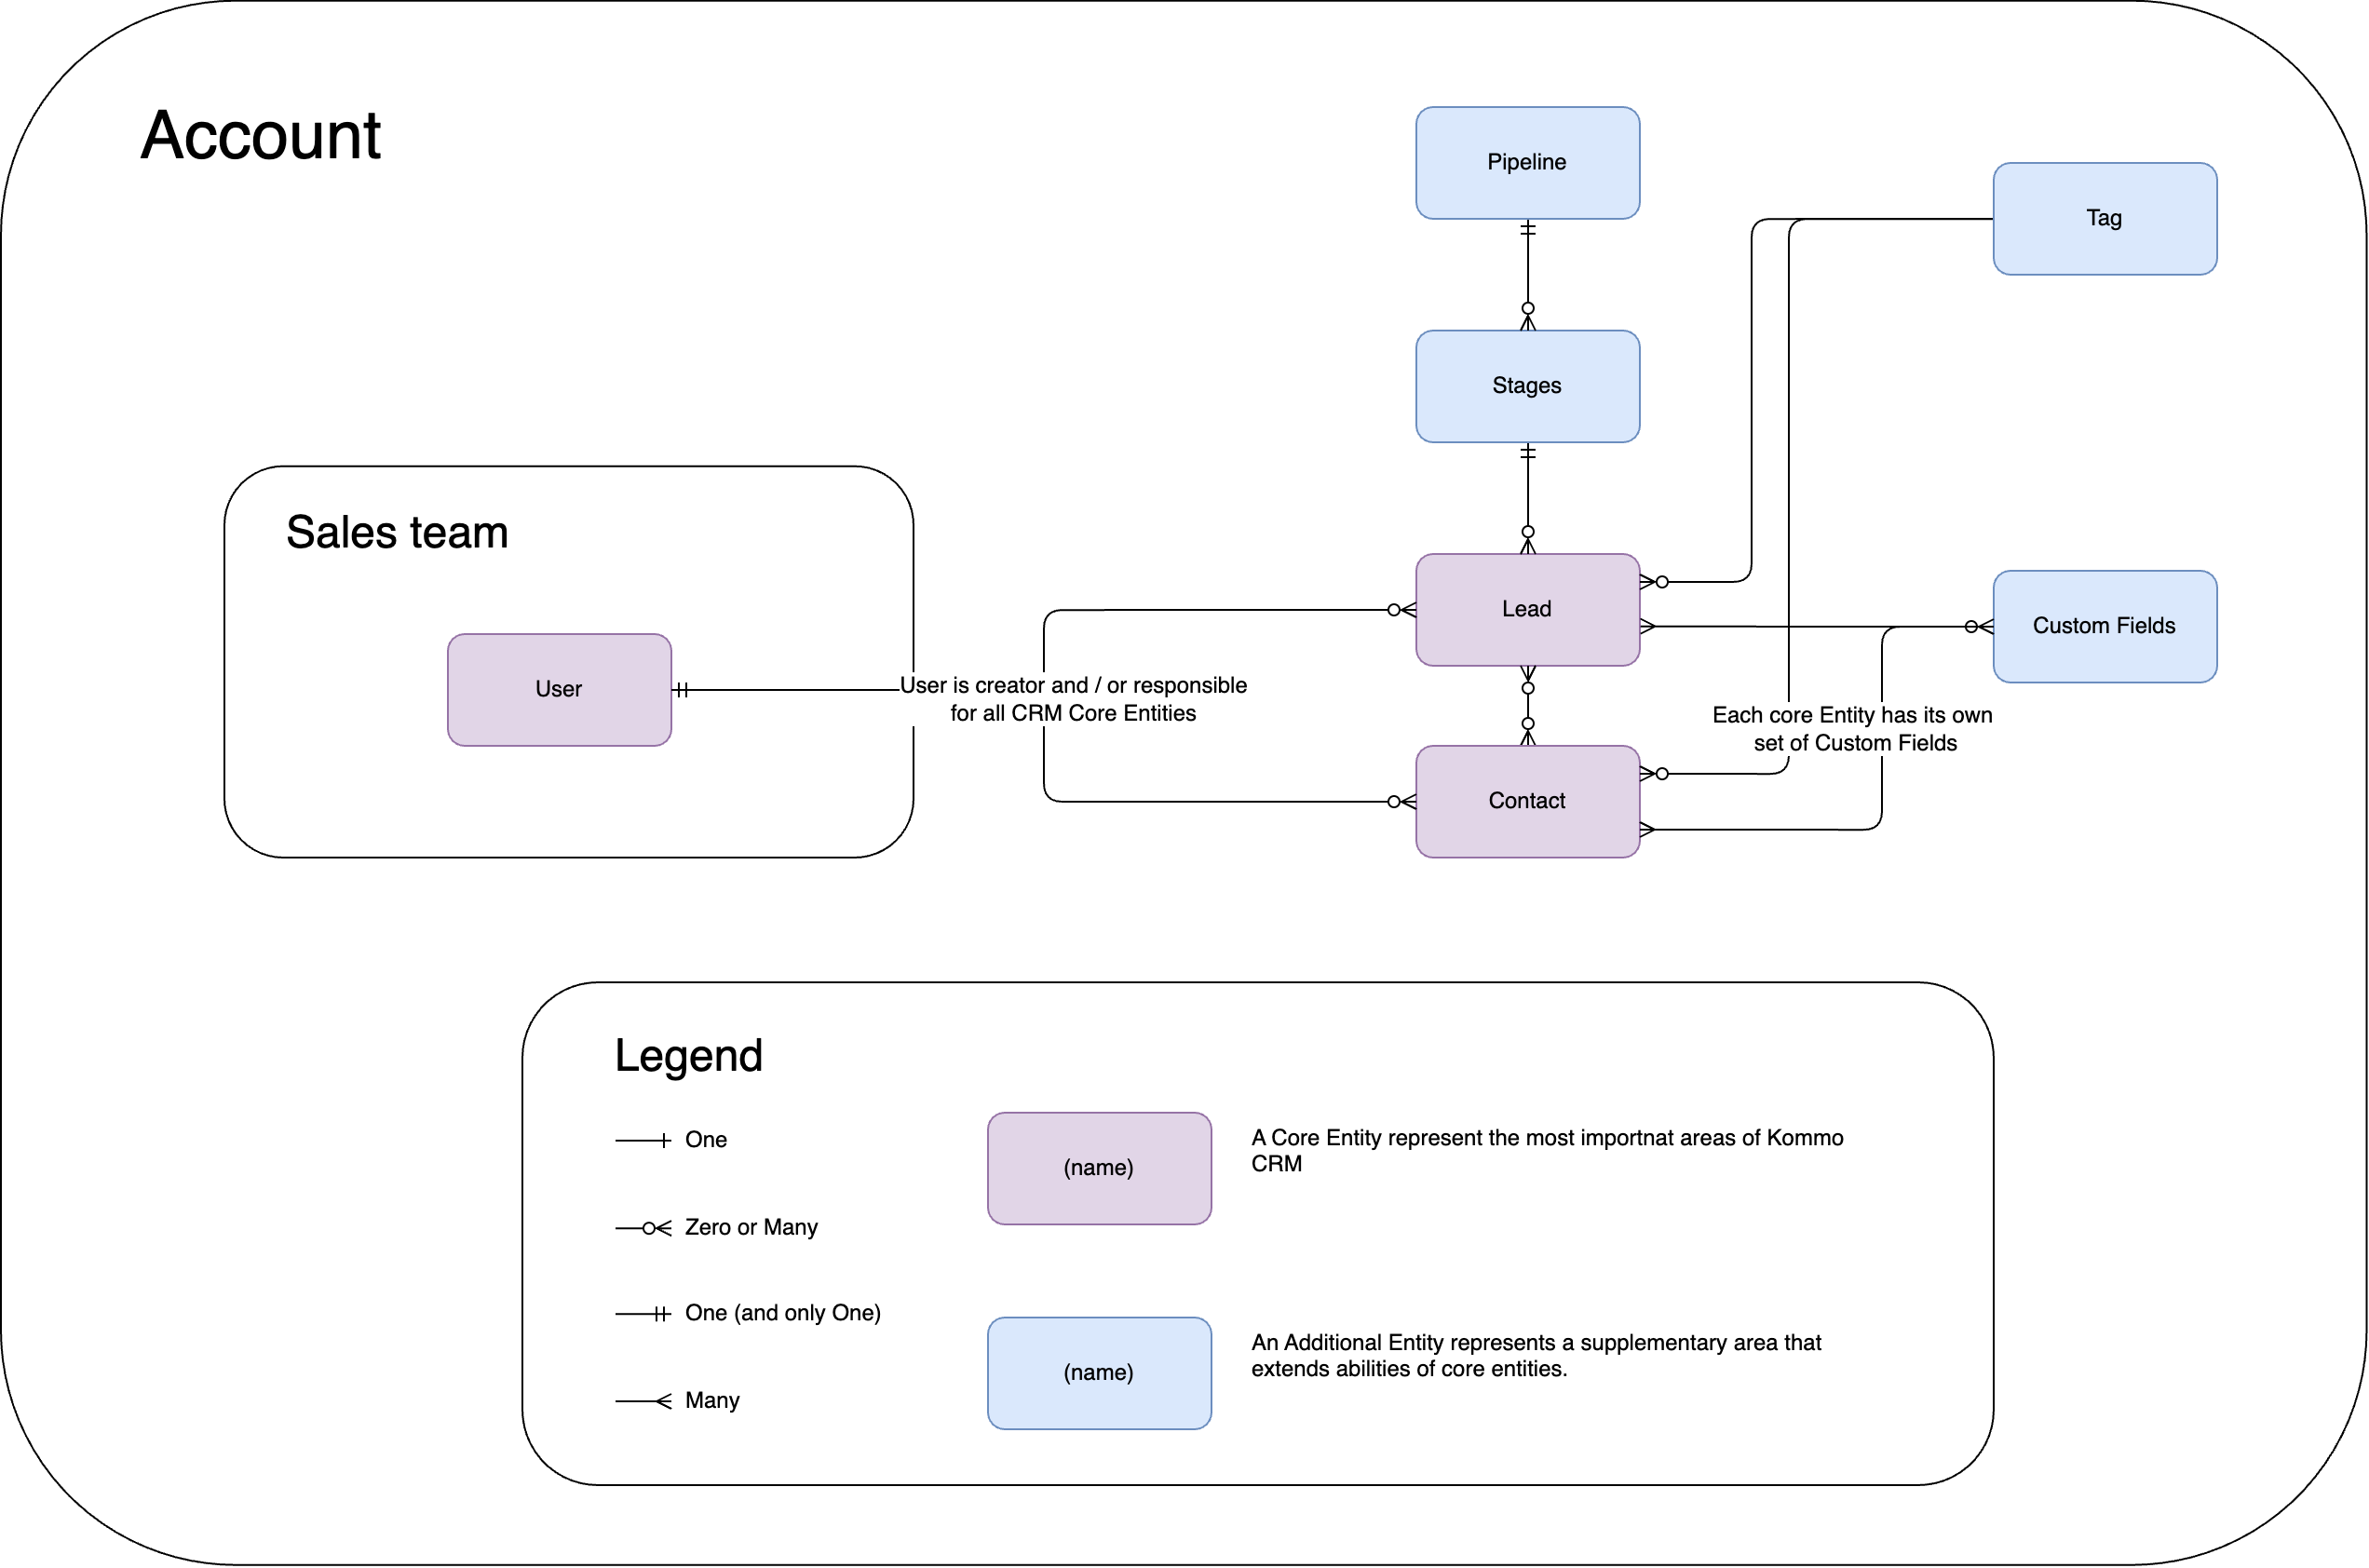
ERD can help us describe a client's business in terms that are used in Kommo CRM
The client we mentioned at the very beginning has an online school for young learners.
So we can say that
- the Account entity represents the school
- the Users represent sales managers.
- the entity Lead represents a student (they are too young, so Contacts are their parents)
- Tags are essential because they help sales managers correctly place students into groups for classes
- there are Custom Fields like Age that will also help with their placing
- there are differentPipelines for different languages
- Stages show the state of a lead in a pipeline (whether a student is scheduled for a demo class or is about to sign a contract)
8. Adding a lead
A school can function and make sense if there are students. Students are represented by leads in Kommo CRM so we will start with such an action as a lead addition.
You can create a lead with a simple POST request even with just one body parameter https://{YOUR_SUBDOMAIN}.kommo.com/api/v4/leads.
But we keep in mind that those leads are supposed to be imported from a form filled out on the school website, so it will contain a little bit more than just the name of a student.
First, let's take a look at the body parameters of the method.
[
    {
        "name": "Annie Hooper",
        "pipeline_id": 8244687,
        "status_id": 65625139,
        "responsible_user_id": 10618939,
        "custom_fields_values": [
            {
                "field_id": 1551478,
                "values": [
                    {
                        "value": 7
                    }
                ]
            }
        ]
    }
]-
name- It is the name of a student from the form -
pipeline_id- it is an ID of a pipeline the lead will be added to. You can get a list of pipelines and set one of them by default since all the leads come from the same form. -
status_id- you can get a stages list and choose one stage for all these leads. -
responsible_user_id- you can get a list of users, sort them by group (Sales team), and write your logic for lead distribution among sales managers. -
custom_fields_values- you can pass extra information from the form like the Age of the student. To do so, you need to know the IDs of custom fields. You can get a list of leads custom fields and choose the one that you need.
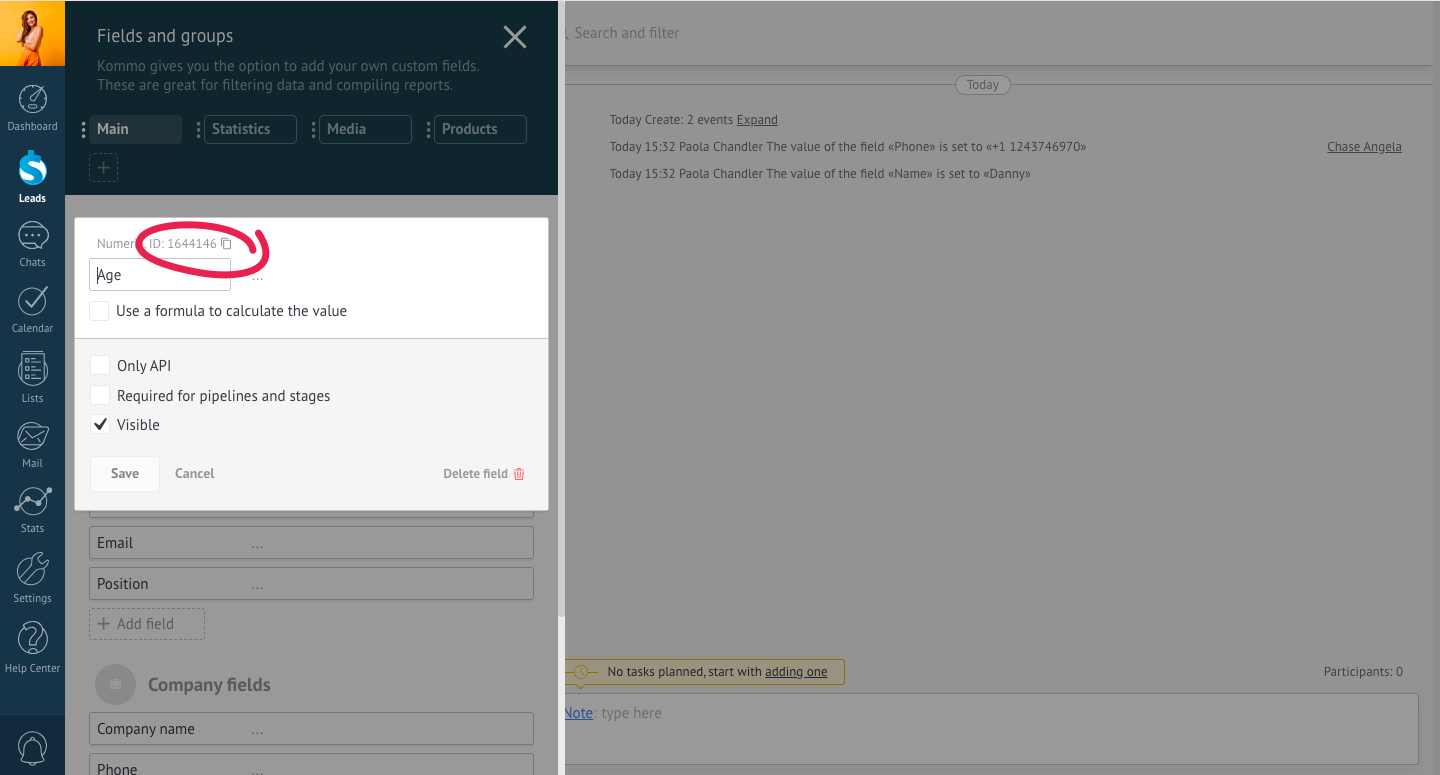
Or you can go to a lead card → Setup → your custom field → copy the ID
Be aware that custom field/pipeline/stage IDs aren't universal. If you try to send the request body from the example above, you will get HTTP status code 400 because a custom field/pipeline/stage with such an ID doesn't exist in your account.
9. Duplicate control
Duplicate control is the ability of an app to check instances of entities that are added and make sure there are no duplicates.
We will go through a code snippet that checks whether a contact of the lead is a new one or already exists in the account.
You can check any entity for duplicates, just keep in mind that the abilities of filtration are limited and for some cases, you will have to use a query parameter to search an instance of the entity that you need.
Language of the snippet - Python
Define account variables
# Put your account subdomain here
SUBDOMAIN = ''

# Put your long-lived or access token
API_KEY = ''
Here we have to define variables that we will use later in the snippet. It is SUBDOMAIN (your account subdomain) and API_KEY (it is your long-lived token or access token).
Define URL variables
BASE_LEAD_URL = f"https://{SUBDOMAIN}.kommo.com/api/v4/leads/complex"
BASE_CONTACT_URL = f"https://{SUBDOMAIN}.kommo.com/api/v4/contacts"
BASE_CONTACT_CUSTOMFIELDS_URL = f"https://{SUBDOMAIN}.kommo.com/api/v4/contacts/custom_fields"
We define variables that we will use later in the code.
BASE_LEAD_URL will be used to add leads with contacts and companies.
BASE_CONTACT_URL will be used to get a list of contacts.
BASE_CONTACT_CUSTOMFIELDS_URL will be used to get a list of contacts custom fields.
Check existing contacts
newContactPhoneNumber = '+18305803077'

params = {
	'query' : newContactPhoneNumber
}

response = requests.get(BASE_CONTACT_URL, params=params, headers=headers)
Here we get a phone number(+18305803077) and add it as a key to the 'query' value.
Then we get a response from a GET request with a query parameter.
You get HTTP status code 204 (No Content)
if (response.status_code == 204):
    response = requests.get(BASE_CONTACT_CUSTOMFIELDS_URL, params=params, headers=headers)
    contactCustomFieldsResponse = response.json()
    print(contactCustomFieldsResponse)
If you get the HTTP code 204 (No content), it means that a contact with such a number doesn't exist.
Then the first thing we do, we send a GET request to get contact's custom fields and save the response as contactCustomFieldsResponse.
    contactCustomFields = contactCustomFieldsResponse["_embedded"]['custom_fields']

    phoneFieldId = ''
    for field in contactCustomFields:
      if (field['code'] == 'PHONE'):
         phoneFieldId = field['id']
         break
From contactCustomFieldsResponse we only need an array of custom fields objects so we save the array as contactCustomFields.
We declare a variable called phoneFieldId and set its initial value to an empty string. It's important to do this to prevent losing data in the following for loop. Each contact can have multiple custom fields, but this variable will specifically store the ID for the phone number custom field.
The for loop iterates through each object (field) in the contactCustomFields array and checks if the 'code' value of the field equals 'PHONE'. If it's true, the id of that field is saved as phoneFieldId, and the loop stops.
    body = [{
        'name': "Example lead 1",
        '_embedded': {
                "contacts" : [
                    {
                        "name" : "New contact",
                        "custom_fields_values" : [{
                           "field_id": phoneFieldId,
                           "values": [
                                {
                                    "value": newContactPhoneNumber
                                }
                            ]
                        }]
                    }
                ]
            }
        }]


    newLeadResponse = requests.post(BASE_LEAD_URL, json=body, headers=headers).json()

    print(newLeadResponse)
Then we need to create a body of request. Since it's a complex addition of the lead, we don't just add data about the lead, but also add the data of the contact. We set phoneFieldId as a new contact's custom field ID, and add the newContactPhoneNumber as its value.
Finally, we send a POST request to add the lead.
There is a contact with such a number
We are assuming that there is only one contact associated with the given phone number. However, if you previously haven't checked leads for duplicates or if the phone number is associated with a company, there may be multiple contacts displayed.
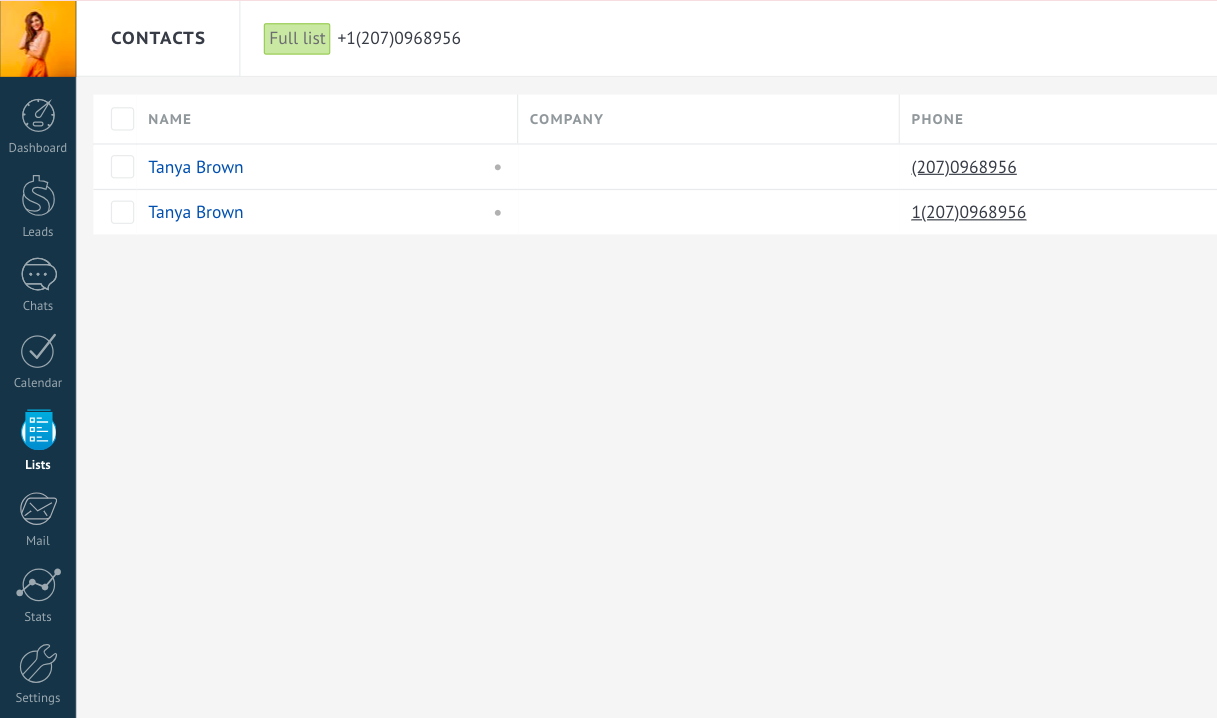
Two contacts with such a phone number already exist
else:
    existingContactsResponse = response.json()
    existingContacts = existingContactsResponse["_embedded"]['contacts']
If there is a contact with such a number, then we get a response body and save the array of contacts as existingContacts. If there are several contacts with the same phone number, there will be several objects in the array. Due to the way filtration works, all results that are relevant to the query will be displayed.
    def findDuplicateContact(contacts, query) -> str:
    	for contact in contacts:
       	contactCustomFields = contact['custom_fields_values']

       	if (contactCustomFields):
           	 for customField in contactCustomFields:
               	 values = customField['values']
                	if (values):
                    	for value in values:
                       	 data = value['value']
                       	 if (data == query):
                            	return contact['id']
      return ''
Then we need to declare a findDuplicateContact function that will return the ID of the contact we found.
Let's take a closer look at what it does.
The for loop goes through all the elements of contacts array and sets only the contact's 'custom_fields_values' array as a contactCustomFields variable.
If contactCustomFields exists and not null, we use another for loop to go through all the custom fields objects and if one of custom_fields_values['values']['value'] equals the query we passed to the function, the function returns the contact ID. It seems a little complicated, but let's review what custom_fields_values looks like.
"custom_fields_values": [
          {
            "field_id": 1698052,
            "field_name": "Phone",
            "field_code": "PHONE",
            "field_type": "multitext",
            "values": [
              {
                "value": "+18305803077",
                "enum_id": 1037745,
                "enum_code": "MOB"
              }
            ]
          }
        ]
...and we should get back to the Duplicate Control.
duplicateContactId = findDuplicateContact(existedContacts, newContactPhoneNumber)We call findDuplicateContactand pass in a list of contacts and the phone number and save the result as duplicateContactId.
    body = [{
        'name': "Example lead 1",
        '_embedded': {
                "contacts" : [
                    {
                        "id" : duplicateContactId
                    }
                ]
            }
        }]


    newLeadResponse = requests.post(BASE_LEAD_URL, json=body, headers=headers).json()

    print(newLeadResponse)
Then we create the body of the request, set duplicateContactId as the contact ID, and send a POST request to add the lead with a contact.
You can find the full code in the Create a Lead with a Contact with Duplicate Control recipe.
10. Include UTMs
An urchin tracking module (UTM) is a snippet of code added to a URL for the purpose of tracking online marketing performance and better understanding audience behavior. These custom URLs, known as UTM codes, provide marketers with detailed information on how a specific campaign, content piece, or channel is performing.
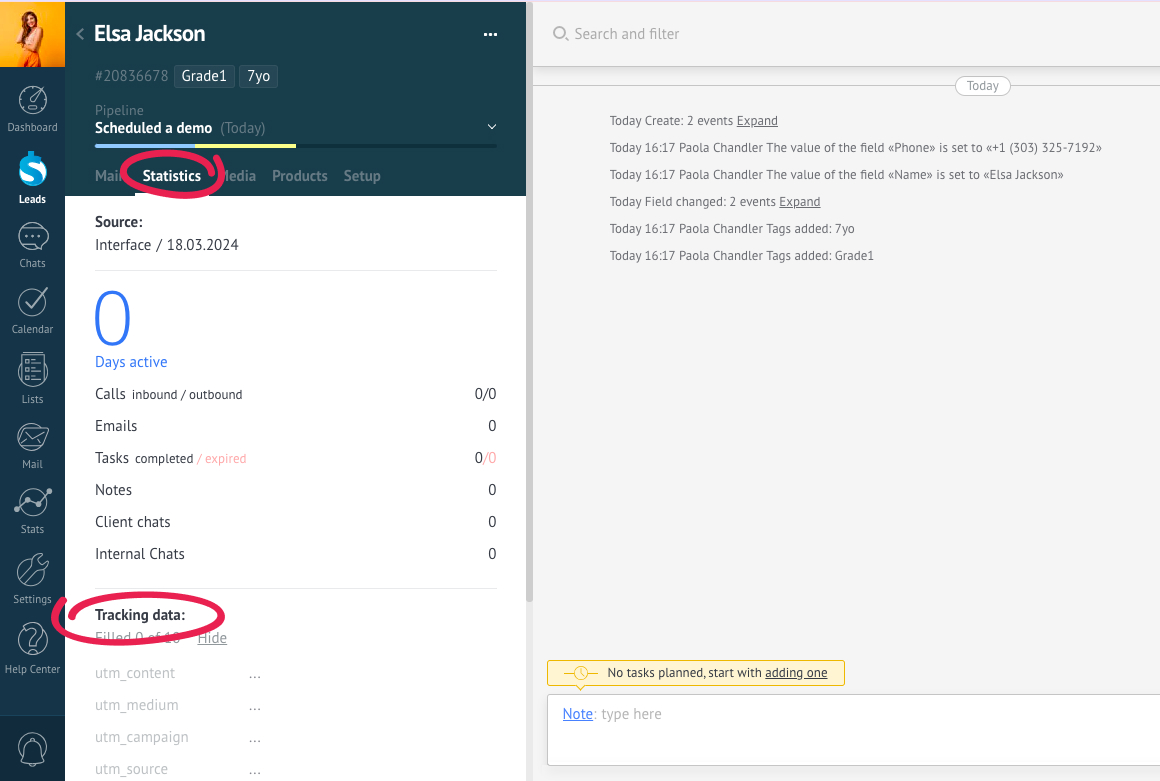
UTM custom fields are created automatically with an account.
You can find them in the Statistics section of a Lead card.
Define variables
import requests
from urllib import parse

SUBDOMAIN = ''
API_KEY = ''

BASE_LEAD_URL = f'https://{SUBDOMAIN}.kommo.com/api/v4/leads'
BASE_LEAD_CUSTOMFIELDS_URL = f'https://{SUBDOMAIN}.kommo.com/api/v4/leads/custom_fields'

headers = {
    'Authorization': f'Bearer {API_KEY}',
    'Content-Type': 'application/json'
}
SUBDOMAIN is your account subdomain.
API_KEY is your long-lived token or access token.
BASE_LEAD_URL will be used to add leads.
BASE_CONTACT_CUSTOMFIELDS_URL will be used to get a list of contacts' custom fields.
Create a URL with UTMs
UTM_URL = 'https://YOUR_WEBSITE.com/?utm_source=google&utm_medium=cpc&utm_campaign=form&utm_content=youtube&utm_term=utm'UTM_URL is an example of a URL that contains UTMs.
If we look at it, we can learn that utm_source is google and utm_campaign value is form.
You can use a free tool such as https://tilda.cc/utm/ to create a URL with UTMs.
Parse the URL
def parseURL(url) -> dict:
    return parse.parse_qs(parse.urlparse(url.lower()).query)

utms = parseURL(UTM_URL)
First, we should define a function (ParseURL) that takes a URL as an argument and returns an object.
If you parse the [UTM_URL], it will return {'utm_source': ['google'], 'utm_medium': ['cpc'], 'utm_campaign': ['form'], 'utm_content': ['youtube'], 'utm_term': ['utm']}.
Get a list of custom fields
response = requests.get(BASE_LEAD_CUSTOMFIELDS_URL, headers=headers)
leadCustomFieldsResponse = response.json()
print(leadCustomFieldsResponse)

customFields = leadCustomFieldsResponse['_embedded']['custom_fields']
We send a GET response to obtain a list of custom fields for the Lead entity. We need only the array of custom fields from the response so we save it as customFields.
Change the format of UTM fields
leadCustomFieldsBody = []

for customField in customFields:
    if (customField['type'] == 'tracking_data'):
        key = customField['code']

        utmValue = utms.get(key.lower())

        if (utmValue):
            leadCustomFieldsBody.append(
                {
                    'field_id' : customField['id'],
                    'values' : [
                        {
                            'value' : utmValue[0]
                        }
                    ]
                }
            )
We use a FOR loop to create a leadCustomFieldsBody array of objects.
Let's take a closer look at what exactly it does.
The loop checks every element of the array of custom fields and determines whether a type of custom field is 'tracking_data'. If so, it declares a variable key with a value of customField["code"].
If we look at utms.get(key.lower()), we see that it returns a value of a utms key that equals variable key but in lower case.
Then it declares utmValue with a value of that key.
Then it pushes an object with a field_id and its value to leadCustomFieldsBody.
Create a lead with UTMs
body = [{
        "name": "Michael Thompson",
        "status_id": 2343875,
        "pipeline_id": 5347887,
        "created_by": 10618939,
        "responsible_user_id": 10618939,
        "_embedded": {
          "tags": [
                {
                    "id": 2936577,
                    "name": "Grade_2"
                },
            		{
                    "id": 2943611,
                    "name": "9yo"
                }
          ]
         },
  			'custom_fields_values' : leadCustomFieldsBody
    }]

newLeadResponse = requests.post(BASE_LEAD_URL, json=body, headers=headers).json()
print(newLeadResponse)
Eventually, we create a body of our future lead where we add leadCustomFieldsBodyto the custom_fields_valueskey and send it with the POST request.
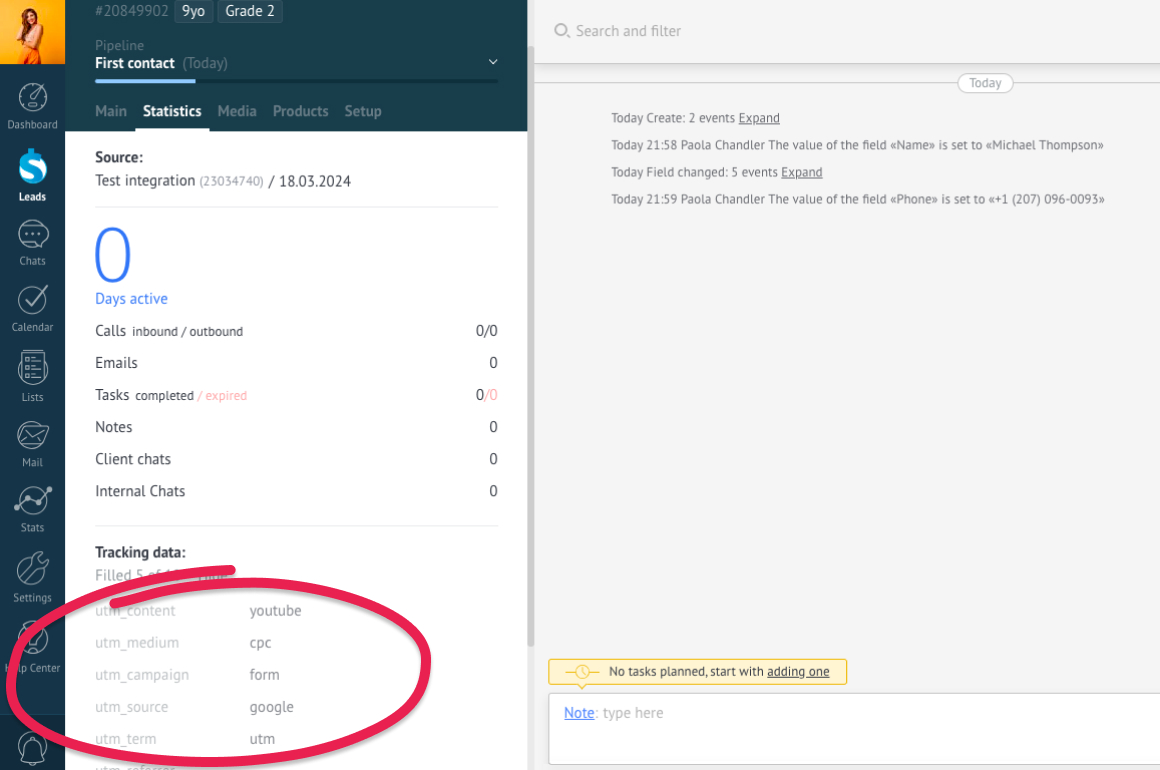
You can find the full code in the Add a lead with UTMs.
Updated 8 months ago