Salesbot SDK
There is an option to automate routine processes by creating bots, and of course, we provide the ability to extend the functionality of bots using widgets.
manifest.json
To make a widget work in the bot constructor, you need to follow these steps:
1.Specify the Salesbot designer location
{
  ...

  "locations": [
    "salesbot_designer"
  ],

  ...
}
2. Add the salesbot_designer object
salesbot_designer objectThis object describes the fields for displaying the widget settings interface in the Salesbot designer:
"salesbot_designer": {
  "logo": "/widgets/my_widget/images/image.jpg",
  "handler_name": {
    "name": "settings.handler_name",
    "settings": {
      "text": {
        "name": "settings.text",
        "default_value": "Hello, i am Salesbot!",
        "type": "text",
        "manual": true, // true - the user must enter a value,
 // false - the user selects a field value.
      },
      "link_to": {
        "name": "settings.link",
        "default_value": "www.kommo.com",
        "type": "url",
      }
    }
  }
}
{
...
"salesbot_designer": {
"logo": "/widgets/my_widget/images/image.jpg",
"handler_sms": {
"name": "settings.handler_sms",
"settings": {
"phone": {
"name": "settings.phone",
"default_value": "+1234456789",
"type": "text"
},
}
},
"handler_email": {
"name": "settings.handler_email",
"settings": {
"email": {
"name": "settings.email",
"default_value": "[email protected]",
"type": "text"
},
}
}
},
...
}The fields in the settings property can have the following type options:
- text
- numeric
- url (link)
If these settings are specified correctly, the widget will appear in the modal window of the Salesbot designer widgets.

script.js
The settings for each handler are specified in the manifest.json file and are then used in the code for Salesbot.
The following callbacks can be added to script.js:
onSalesbotDesignerSave
onSalesbotDesignerSaveAfter the user has configured their sequence in the Salesbot designer and clicked the Save button, the onSalesbotDesignerSave callback is executed in the widget.
The method should return a string in the format of JSON code for the Salesbot, taking into account the bot's exit codes.
It accepts the following inputs:
handler_code(the handler code of the object in thesalesbot_designerobject)params(the widget settings in the specified format)
onSalesbotDesignerSave: function (handler_code, params) {
  var salesbot_source = {
      question: [],
      require: [],
    },
    values = [];
  salesbot_source.question.push({ type: 'text' });

  $.each(params, (param) => {
    values.push(param);
  });

  salesbot_source.question.push({
    values: values,
  });

  salesbot_source.question.push({ accept_unsorted: 'false' });
  return JSON.stringify([salesbot_source]);
};
onSalesbotDesignerSave: function (handler_code, params) {
var request_data = {
message: params.message,
};
if (APP.getBaseEntity() === 'lead') {
request_data.lead = '{{lead.id}}';
};
return JSON.stringify([
{
question: [
{
handler: 'widget_request',
params: {
url: 'https://example.com/webhook',
data: request_data,
},
},
{
handler: 'goto',
params: {
type: 'question',
step: 1,
},
},
],
},
{
question: [
{
handler: 'conditions',
params: {
logic: 'and',
conditions: [
{
term1: '{{json.status}}',
term2: 'success',
operation: '=',
},
],
result: [
{
handler: 'exits',
params: {
value: 'success',
},
},
],
},
},
{
handler: 'exits',
params: {
value: 'fail',
},
},
],
},
]);
},In the Example 2, the SMS sending widget sends a request to its service to send a message. Upon receiving a response, it goes to a conditional block. If the response status is successful, it proceeds to the success exit. If the sending fails and an error is received, it goes to the fail exit. If the user has configured a sequence in the bot for errors (for example, if the SMS could not be sent, then send an email to the client), the bot will follow that sequence.
salesbotDesignerSettings
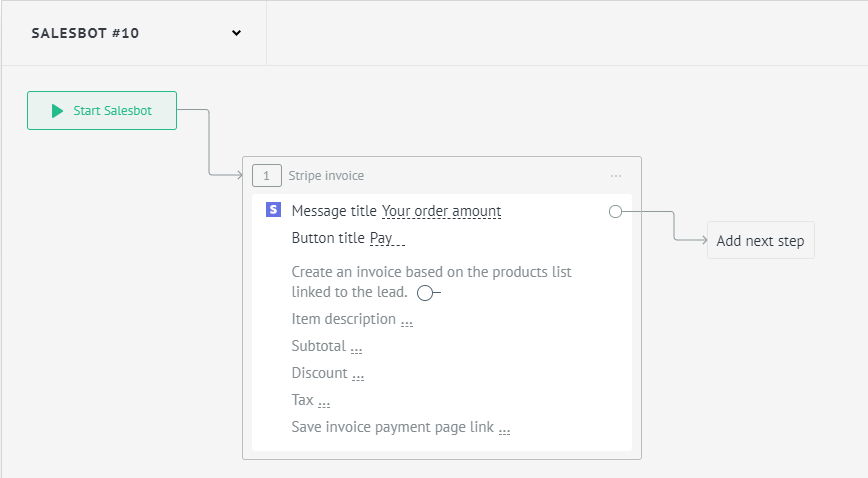
salesbotDesignerSettingsWhen the user clicks the Add button under the widget, the salesbotDesignerSettings callback will be triggered. Using this callback, you can change the appearance of your widget's block in the designer.
The method can return an object with the key exits, which will contain the possible exits from the widget block in the bot. A widget can have one or multiple possible outcomes (for example, execution might end with an error, and the bot needs to be directed to an alternative scenario).
The exits array should contain objects with the keys code (exit code) and title (exit name).
The callback accepts the following parameters:
body– jQuery object of the widget blockrenderRow– a function that takes the field name as a parameter and returns the markup of the field in the styles of the designerparams– settings of the already created handler
function(caption) {
  return twig({
    ref: '/tmpl/salesbot_designer/controls/widget_param.twig',
  }).render({
    caption: caption,
    is_widget: true,
  });
}
Examples of implementation of this callback:
salesbotDesignerSettings: function ($body, renderRow, params) {
  var use_catalog =
      $body
        .find('[data-field-name="invoice_catalog"][name = "value_manual"]')
        .val() == 'true',
    $catalog_switcher = $(renderRow())
      .append(self.langs.invoice_catalog)
      .append(
        self.render(
          {
            ref: '/tmpl/controls/switcher.twig',
          },
          {
            checked: use_catalog,
            custom_class_name: 'switcher_blue',
            id: 'stripe_invoice_catalog',
          },
        ),
      );
  return {
    exits: [
      { code: 'success', title: self.i18n('salesbot').success_callback_title },
      { code: 'fail', title: self.i18n('salesbot').fail_callback_title },
    ],
  };
}
this.callbacks = {
...
salesbotDesignerSettings: function ($body, renderRow) {
$body.find('[data-field-name="sms"]')
.replaceWith(
$(renderRow('SMS'))
.append('Custom layout')
);
return {
exits: [
{ code: 'success', title: 'Upon successful execution' },
{ code: 'fail', title: 'In case of an error' }
]
};
},
...
}Updated 8 days ago