
Skeleton
What is Skeleton
Skeleton is a command line interface (CLI) designed to facilitate the development of widgets on the Kommo platform. Automates the configuration, deployment and documentation process, generating a basic project structure (skeleton) with React, TypeScript, and other modern technologies.
- It allows you to create custom widgets quickly
- Includes typing, documentation and localization options
- It improves the developer experience by reducing bugs and development time
Why to use?
Skeleton solves the main problems that developers face when working with widgets in Kommo:
- Difficulty setting up development environments and deploying widgets
- Need for customization and scalability
Advantages:
- It accelerates development
- It improves the quality of the code
- Reduces errors
- Reduces the burden on the support team
Logic of work
Step 1: Run npx @kommo-crm/create-kommo-integration in your terminal (add flags project-name and --en/--es/--pt to skip prompts).
Step 2: If not using flags, pick a language (English, Spanish, or Portuguese) when prompted.
Step 3: Enter the project directory name. The CLI will create a folder for your widget.
Step 4: Choose the locale(s) you need; the tool will create /i18n with translation JSON files (en.json, es.json, etc.).
Step 5: The CLI will guide you through manifest setup prompting for any extra required fields.
These interactive prompts ensure your widget’s configuration and manifest are correctly set up.
List of locations
This table lists every location where a widget can live inside Kommo:
List of locations
    <th style={{ textAlign: "left" }}>
      Possible names in the list
    </th>
  </tr>
</thead>

<tbody>
  <tr>
    <td style={{ textAlign: "left" }}>
      `lcard-1`
    </td>

    <td style={{ textAlign: "left" }}>
      Widget is in the right panel of a lead profile
    </td>
  </tr>

  <tr>
    <td style={{ textAlign: "left" }}>
      `lcard-0`
    </td>

    <td style={{ textAlign: "left" }}>
      Widget is initialized in a lead profile
    </td>
  </tr>

  <tr>
    <td style={{ textAlign: "left" }}>
      `ccard-1`
    </td>

    <td style={{ textAlign: "left" }}>
      Widget is in the right panel of a contact profile
    </td>
  </tr>

  <tr>
    <td style={{ textAlign: "left" }}>
      `ccard-0`
    </td>

    <td style={{ textAlign: "left" }}>
      Widget is initialized in a contact profile
    </td>
  </tr>

  <tr>
    <td style={{ textAlign: "left" }}>
      `comcard-1`
    </td>

    <td style={{ textAlign: "left" }}>
      Widget is in the right panel of a company profile
    </td>
  </tr>

  <tr>
    <td style={{ textAlign: "left" }}>
      `comcard-0`
    </td>

    <td style={{ textAlign: "left" }}>
      Widget is initialized in a company profile
    </td>
  </tr>

  <tr>
    <td style={{ textAlign: "left" }}>
      `llist-1`
    </td>

    <td style={{ textAlign: "left" }}>
      Widget is available in the lead list menu
    </td>
  </tr>

  <tr>
    <td style={{ textAlign: "left" }}>
      `llist-0`
    </td>

    <td style={{ textAlign: "left" }}>
      Widget is initialized in the lead list
    </td>
  </tr>

  <tr>
    <td style={{ textAlign: "left" }}>
      `clist-1`
    </td>

    <td style={{ textAlign: "left" }}>
      Widget is available in the contact list menu
    </td>
  </tr>

  <tr>
    <td style={{ textAlign: "left" }}>
      `clist-0`
    </td>

    <td style={{ textAlign: "left" }}>
      Widget is initialized in the contact list
    </td>
  </tr>

  <tr>
    <td style={{ textAlign: "left" }}>
      `tlist-1`
    </td>

    <td style={{ textAlign: "left" }}>
      Widget is available in the task list menu
    </td>
  </tr>

  <tr>
    <td style={{ textAlign: "left" }}>
      `tlist-0`
    </td>

    <td style={{ textAlign: "left" }}>
      Widget is initialized in the task list
    </td>
  </tr>

  <tr>
    <td style={{ textAlign: "left" }}>
      `settings`
    </td>

    <td style={{ textAlign: "left" }}>
      Widget settings modal
    </td>
  </tr>

  <tr>
    <td style={{ textAlign: "left" }}>
      `advanced_settings`
    </td>

    <td style={{ textAlign: "left" }}>
      Widget page in advanced settings
    </td>
  </tr>

  <tr>
    <td style={{ textAlign: "left" }}>
      `card_sdk`
    </td>

    <td style={{ textAlign: "left" }}>
      Widget inside card via [SDK](https://developers.kommo.com/docs/card-sdk).
    </td>
  </tr>

  <tr>
    <td style={{ textAlign: "left" }}>
      ` catalogs`
    </td>

    <td style={{ textAlign: "left" }}>
      Widget in catalog list
    </td>
  </tr>

  <tr>
    <td style={{ textAlign: "left" }}>
      `digital_pipeline`
    </td>

    <td style={{ textAlign: "left" }}>
      Widget in automation settings (DP)
    </td>
  </tr>

  <tr>
    <td style={{ textAlign: "left" }}>
      `lead_sources`
    </td>

    <td style={{ textAlign: "left" }}>
      Widget in lead sources
    </td>
  </tr>

  <tr>
    <td style={{ textAlign: "left" }}>
      `widget_page`
    </td>

    <td style={{ textAlign: "left" }}>
      Widget in the left menu (public integrations). See more:
      [Left menu bar](https://developers.kommo.com/docs/left-menu)
    </td>
  </tr>

  <tr>
    <td style={{ textAlign: "left" }}>
      `sms`
    </td>

    <td style={{ textAlign: "left" }}>
      SMS
    </td>
  </tr>

  <tr>
    <td style={{ textAlign: "left" }}>
      `mobile_card ***`
    </td>

    <td style={{ textAlign: "left" }}>
      Mobile app
    </td>
  </tr>

  <tr>
    <td style={{ textAlign: "left" }}>
      `salesbot_designer`
    </td>

    <td style={{ textAlign: "left" }}>
      Salesbot designer area
    </td>
  </tr>

  <tr>
    <td style={{ textAlign: "left" }}>
      `website_chat_button`
    </td>

    <td style={{ textAlign: "left" }}>
      Website chat button
    </td>
  </tr>

  <tr>
    <td style={{ textAlign: "left" }}>
      `everywhere`
    </td>

    <td style={{ textAlign: "left" }}>
      Everywhere
    </td>
  </tr>
</tbody>
The locations array in manifest.json determines where—and how—users will see your widget.
Extra properties for the Manifest
This table maps each special location to the JSON block you must add in manifest.json:
| Location | Additional properties in Manifest | Description |
|---|---|---|
digital_pipeline | "dp": { " | Controls multi‑element actions and sets the webhook endpoint Kommo will call |
advanced_settings | "advanced": { "title": "advanced.title" } | Only needs the tab title that appears in Advanced Settings |
mobile_card | "mobile": { , | URL loaded inside the Kommo mobile app plus header color |
sms | "sms": { https://example.com/sms_endpoint" } | The endpoint Kommo will hit when sending SMS |
Include only the blocks that match the locations you selected—otherwise Kommo will reject the manifest
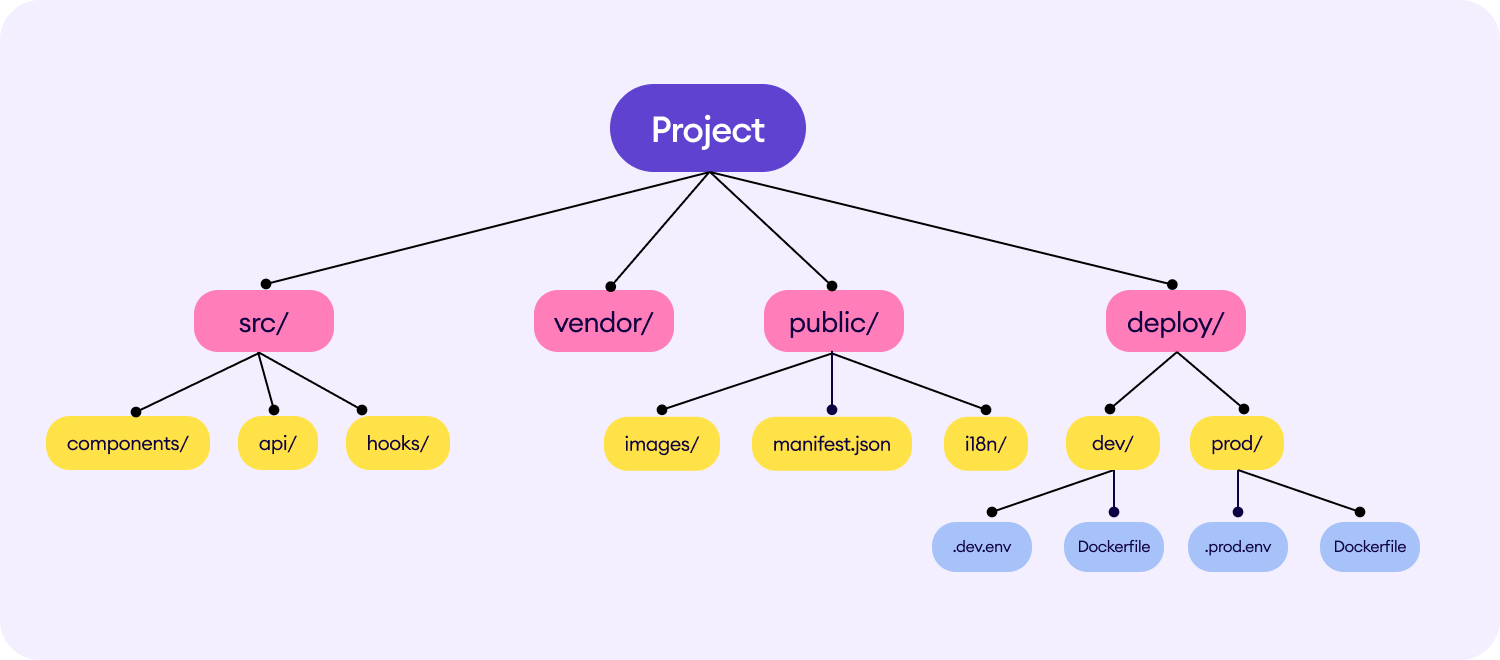
Project Structure
TypeScript Typing:
- Widget lifecycle methods (
init(), render(), settings()...) - Internal methods (
get_settings(), etc.) APPvariable for interacting with Kommo’s API
Enabling Development Mode After Uploading the Widget Archive
Step 1: Configure Environment
Before starting development or building the production widget, fill in the required environment variables. The project includes two predefined environment files:
.dev.env— used in development.prod.env— used during the production build
Update these files with appropriate values.
Never commit these files with real secrets to version control. Use environment-specific secret management in CI/CD for deployment.
Step 2: Build
Option A: With Docker & Make
Generate a production-ready ZIP bundle:
Option B: Locally with yarn
You can also build without Docker:
This will create a dist folder with your build script, manifest etc. and zip archive.
Step 3: Development
Option A: With Docker
Bring up the dev server with one command:
Option B: Locally with yarn
You can also run the dev server without Docker:
Step 4: Enabling Development Mode After Uploading the Widget Archive
To enable dev mode after uploading the widget.zip archive, follow these steps:
- Ensure the correct port and widget code are set in your environment variables. In your
.dev.envand.prod.envfile, make sure the following are properly configured:LOCALHOST_PORT— This should match the port your local development server is running on (e.g., 9000).INTEGRATION_CODE— This should be the code specific to your widget. You can find it in the Key and Scopes tab after creating an integration.
- Enable dev mode by adding the following to
localStoragein the client's browser. You can do this by opening the browser's developer console and entering the following command:
localStorage.setItem('your_widget_code_is_dev', '9000');Use the same port as LOCALHOST_PORT and the same widget code as INTEGRATION_CODE in .env files.
Alternatively, you can manually add the localStorage entry in the browser's storage if needed.
Once done, the widget will load resources from your local dev server when in dev mode, allowing you to test without having to re-upload the widget archive every time.